How to protect APIs with JWT and API Gateway Lambda Authorizer

Mariano works in Claranet Italia, where he daily helps companies succeed using cloud and microservices.
He's also an AWS Authorized Instructor and AWS Community Builder.
JSON Web Token (JWT) is an open standard (RFC 7519) that defines a way for transmitting information – like authentication and authorization facts – between two parties: an issuer and an audience. Communication is safe because each token issued is digitally signed, so a consumer can verify if the token is authentic or has been forged.
In a previous story, we talk in depth about it: how it is built, what problems it solves, what is the theory behind signature’s validation and, finally, how we can protect our resource.
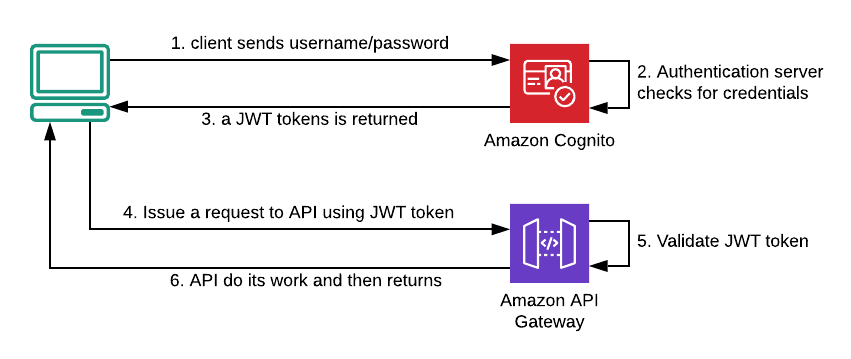 Fig. 1 — The classic flow of serverless authentication and authorization.
In that scenario, a client who wants to access a protected resource needs a JWT. Without it, the same client needs to contact the authentication server exchanging username and password for a brand new JWT (from steps 1 to 3 of Fig.1). With this token, it can eventually request the protected resource trough Amazon API Gateway, that has to validate it (from steps 4 to 6 of Fig.1).
By that article, we presented the theory but nothing has been said about a real implementation.
We need to fix it! But first… a step back!
Framing the context
Amazon API Gateway is a wonderful tool with many features, but at its core, it is basically a component that routes an incoming HTTP request to the responsible backend.
 Fig.2 — A classic API REST on AWS.
The image above well represent this concept, as we have:
the HTTP REST endpoint: implemented using Amazon API Gateway (e.g.
GET /orders);the endpoint’s backend: it could be an AWS Lambda function (like in Fig.2), a containerized microservice, a load balancer, an HTTP endpoint and so on;
So, what about token’s validation?
As far as we have seen, cowboy’s logic would suggest introducing validation code right into the backend logic. Something like:
import lib.isAuthorized

function getOrders(token) {
    if(isAuthorized(token))
    {
        // business logic goes here
    }
}
I don’t really like to mix authorization and business code together but, especially in a monolithic application, there’s nothing intrinsically bad with this approach. Problems start when we have a more service-oriented architecture, like microservices. If every service would be a whole with authorization code, as soon as we found a bug, we have to redeploy the entire system just to fix it.
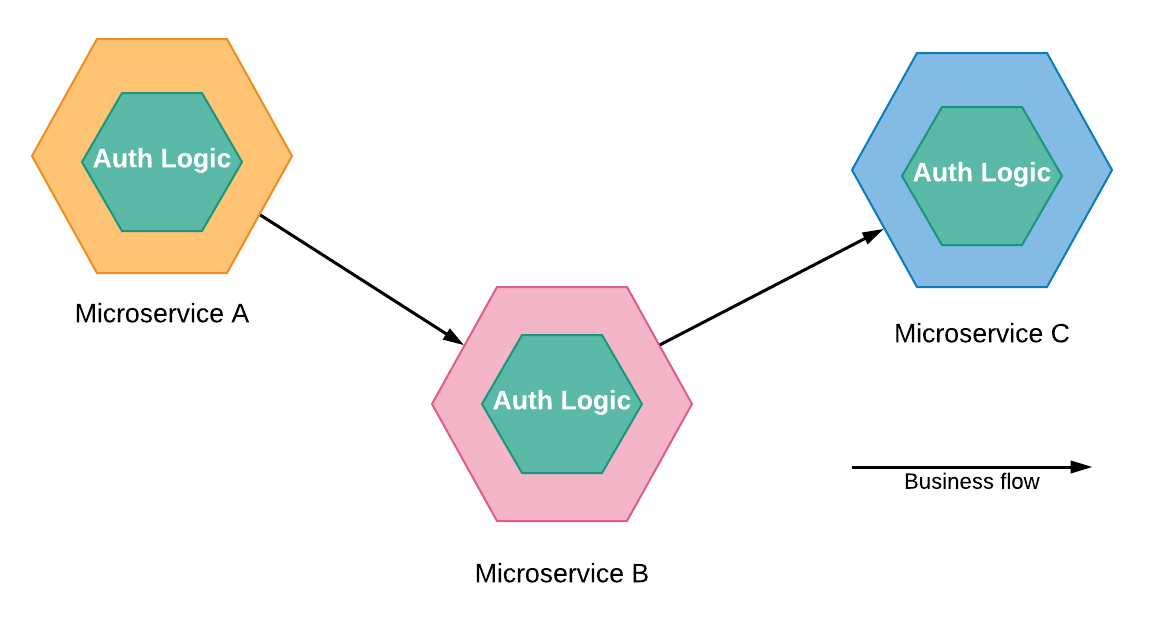 Fig.3 (don’t try this at home) — A microservice system strongly coupled with authentication logic.
A more savvy approach would suggest eradicating the authorization logic from the business code, creating a new service dedicated to it. The day we need to fix the authorization logic we have to redeploy just one service type.
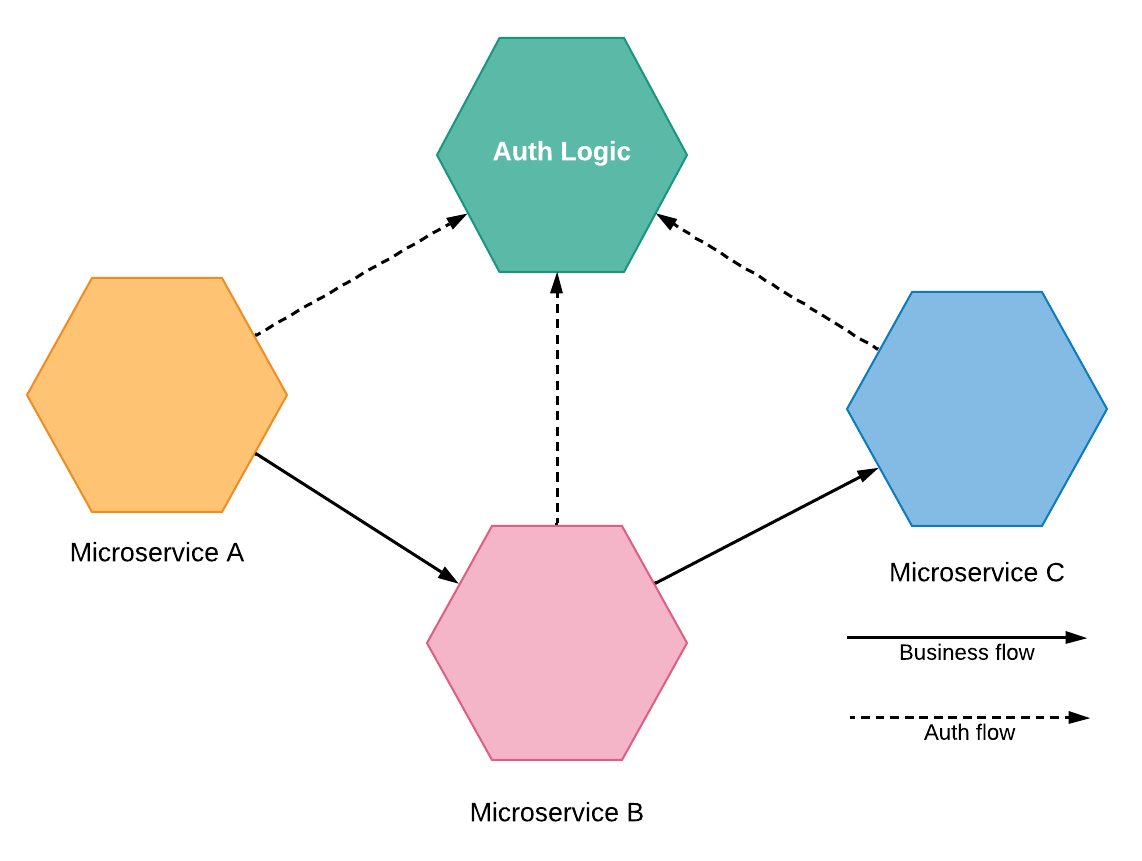 Fig.4 — A microservice system with an external service for authentication logic.
Back to the Fig. 2 example, now we know it’s better to split the direct communication between Amazon API Gateway and AWS Lambda, using an external service to handle authorization logic.
Introducing Lambda Authorizer
A Lambda Authorizer (formerly known as Custom Authorizer) is a peculiar type of Lambda function. It accepts an object containing a token and returns a JSON policy to allow or block an API execution. Something like this:
{
    "principalId": "apigateway.amazonaws.com",
    "policyDocument": {
        "Version": "2012-10-17",
        "Statement": [{
            "Action": "execute-api:Invoke",
            "Effect": "Allow",
            "Resource": "arn:aws:execute-api:{REGION}:{ACCOUNT_ID}:{API_ID}/Prod/GET/"
        }]
    }
}
With the above policy, the API Gateway service (i.e. the principalId equals to apigateway.amazonaws.com) is allowed (i.e. Effect equals to Allow) to invoke (i.e. Action equals to execute-api:Invoke) a given API resource (e.g. Resource equals toarn:aws:execute-api:{REGION}:{ACCOUNT_ID}:{API_ID}/Prod/GET/).
In order to understand what policy our function has to return, it needs to verify the token. By convention, the authorizer function accepts an argument (in Lambda dialect its name is Event Source), henceforward referred to as event, that has two important properties:
event.authorizationToken— the token we want to verify;event.methodArn— the ARN of the API request that triggered the authorizer;
Our first Lambda Authorizer
To gradually introduce the logic, here we present a very simple (and not so secure) authorizer:
exports.handler = async (event) => {
    if(event.authorizationToken === "OK")
        return allowPolicy(event.methodArn);

    return denyAllPolicy();
};

function denyAllPolicy(){
    return {
        "principalId": "*",
        "policyDocument": {
            "Version": "2012-10-17",
            "Statement": [
                {
                    "Action": "*",
                    "Effect": "Deny",
                    "Resource": "*"
                }
            ]
        }
    }
}

function allowPolicy(methodArn){
    return {
        "principalId": "apigateway.amazonaws.com",
        "policyDocument": {
            "Version": "2012-10-17",
            "Statement": [
                {
                    "Action": "execute-api:Invoke",
                    "Effect": "Allow",
                    "Resource": methodArn
                }
            ]
        }
    }
}
In the above code, the authorizer evaluate the token, if its value is OK it will be returned a policy that will let the request flow to continue. Otherwise, the policy expressed by denyAllPolicy is returned and flow is interrupted.
Creating our first Lambda Authorizer
As a first step we want to build the Lambda Authorizer itself, so create a Node.js 10.x Lambda function and paste the above code in the editor and save (here a tutorial). The Second step (optional if you already have an API to play with) is the creation of an API that we want to protect. To go as fastest as possible, we can create a new serverless Web Application — no matter the language — using AWS CodeStar (here a tutorial).
Once CodeStar has built all the components, open the Amazon API Gateway console and search for this new API (the name will be similar to the name of the CodeStar project) and expand it.
 Fig.6–The authorizers' list (currently empty) for our API.
At this point, we can jump into “Authorizers” tab and click “Create New Authorizer”.
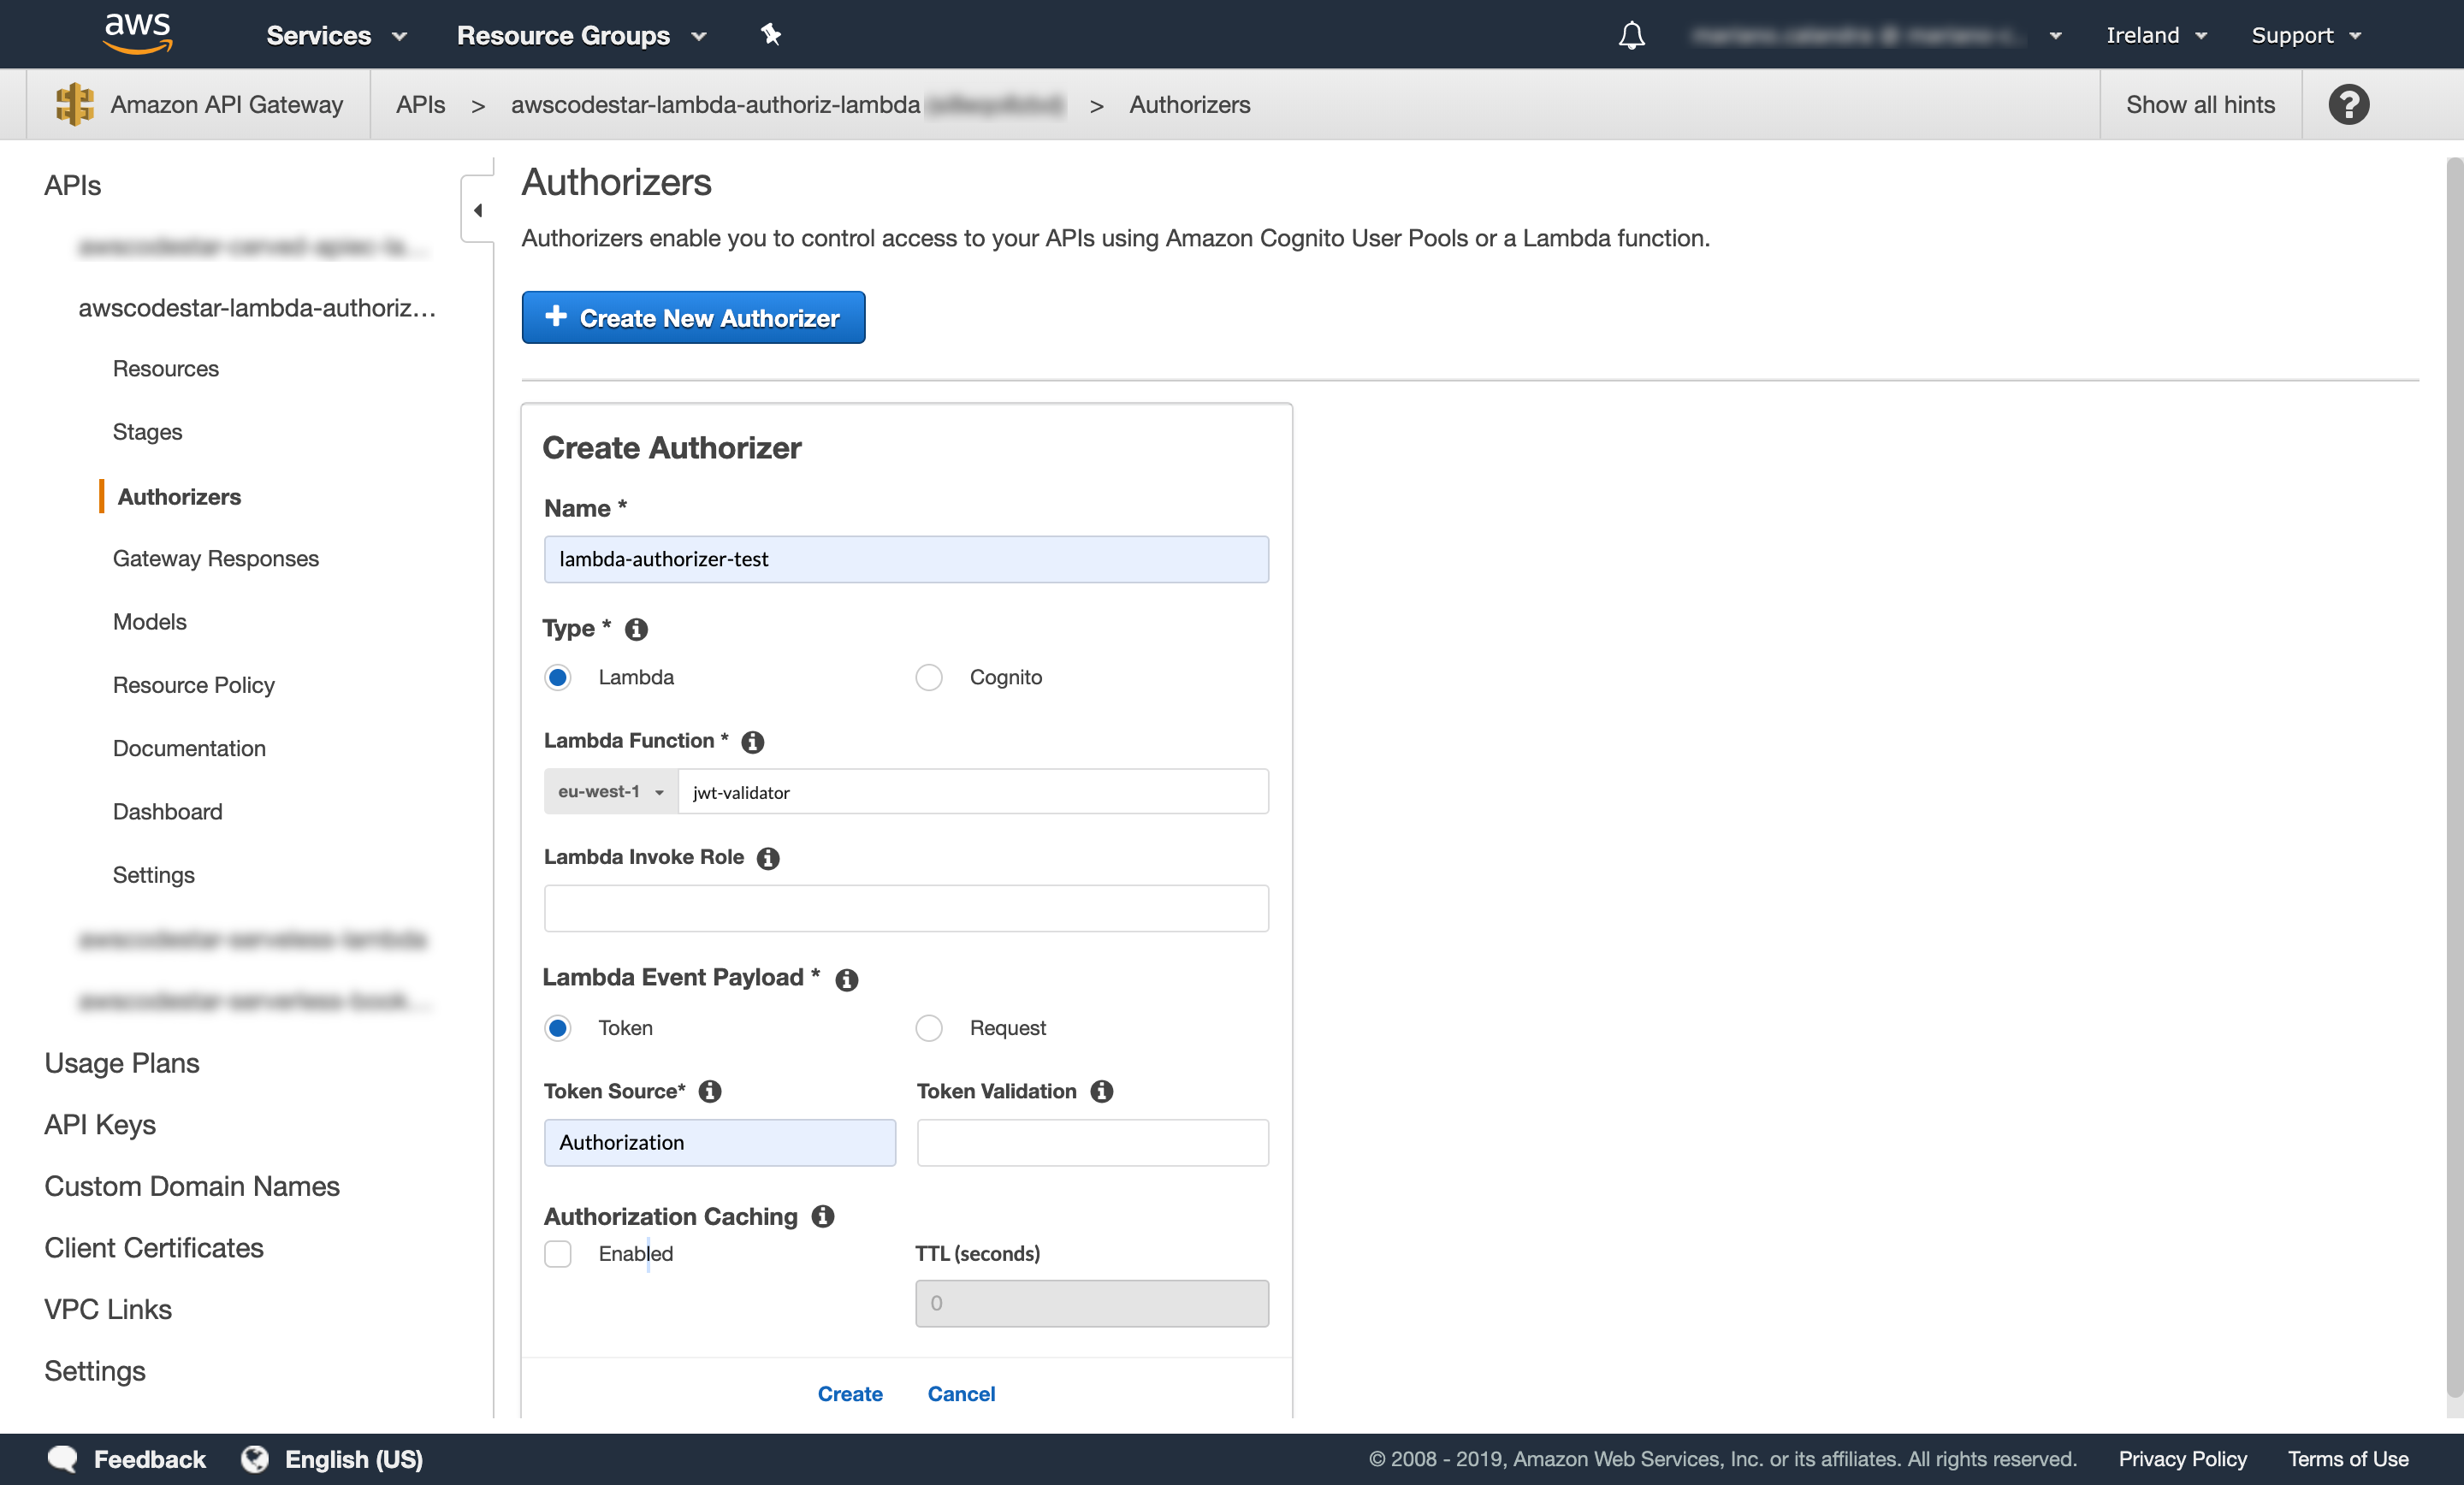 Fig.7–The creation of our first authorizer.
To create a new Authorizer we need to choose a name (e.g. lambda-authorizer-test) and a type (i.e. Lambda).
Note: If you are already using Amazon Cognito User Pool as Identity Provider, you should choose Cognito as authorizer type. Click here if you want to read more.
Inside the Lambda Function field, we have to provide the Lambda function that will act as an authorizer and that we’ve created as the first step of this section.
Finally, we have to explain how our client will send the token during the API request. By convention, this is sent through the Authorization HTTP header, so we can set it into the “Token Source” (Fig.7).
For this example, we don’t want to set a regular expression to validate the syntactic correctness of the token, neither we want to use a cache, so we just hit “Create”.
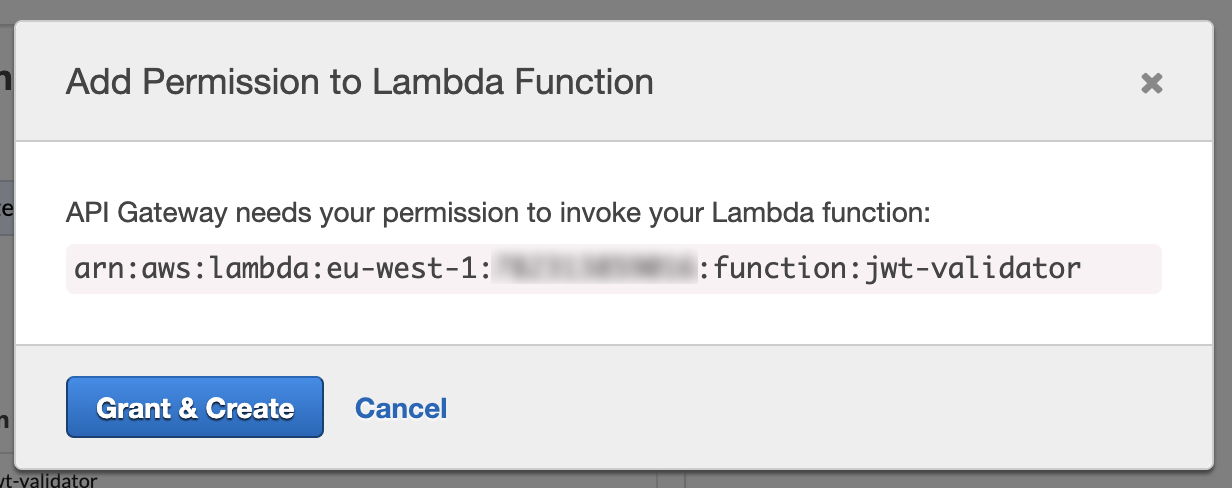 Fig.8–API Gateway needs a role to execute the function, here we can create it.
Since Amazon API Gateway needs a role with specific permissions to invoke the authorizer, if the above popup appears, accept the hint by clicking “Grant & Create”.
In the “Authorizers” tab, previously empty (Fig.6), now we can see our Authorizer.
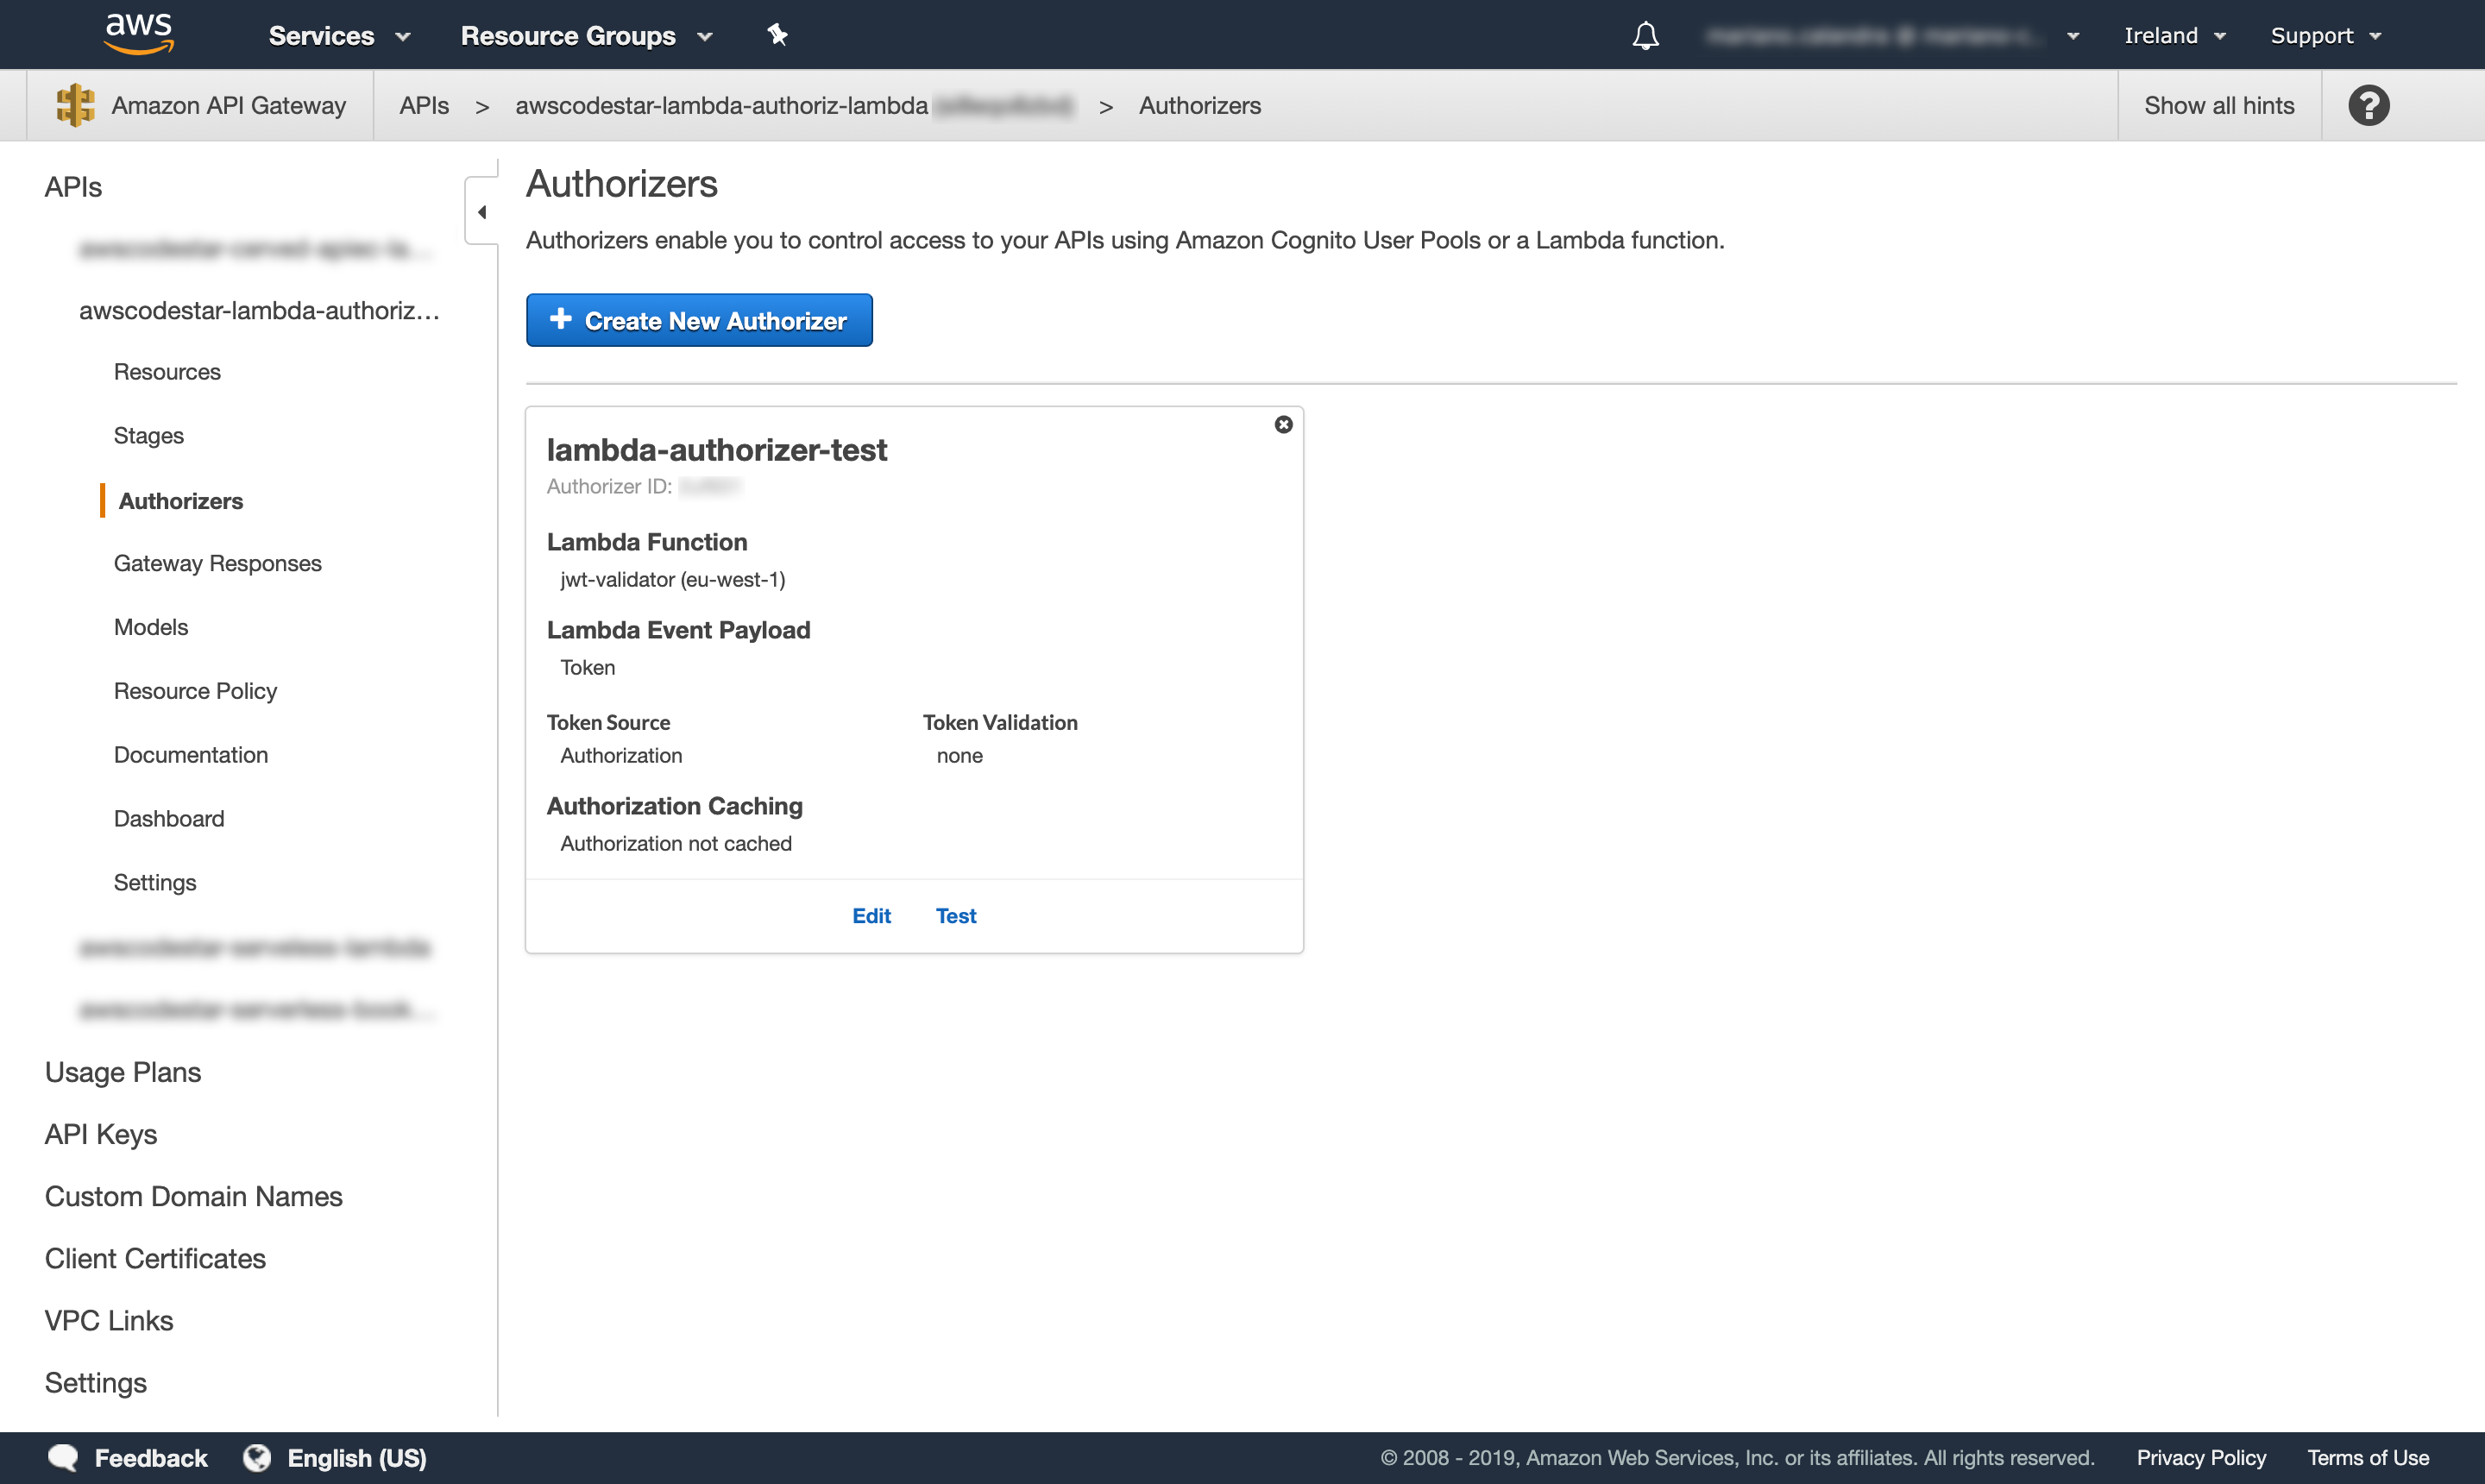 Fig. 9–Once we create our authorizer we can test it.
Before we go any further, click “Test” and check it’s logic. In the example below, we use the string “NOT OK” that, as expected, returns the deny-all policy.
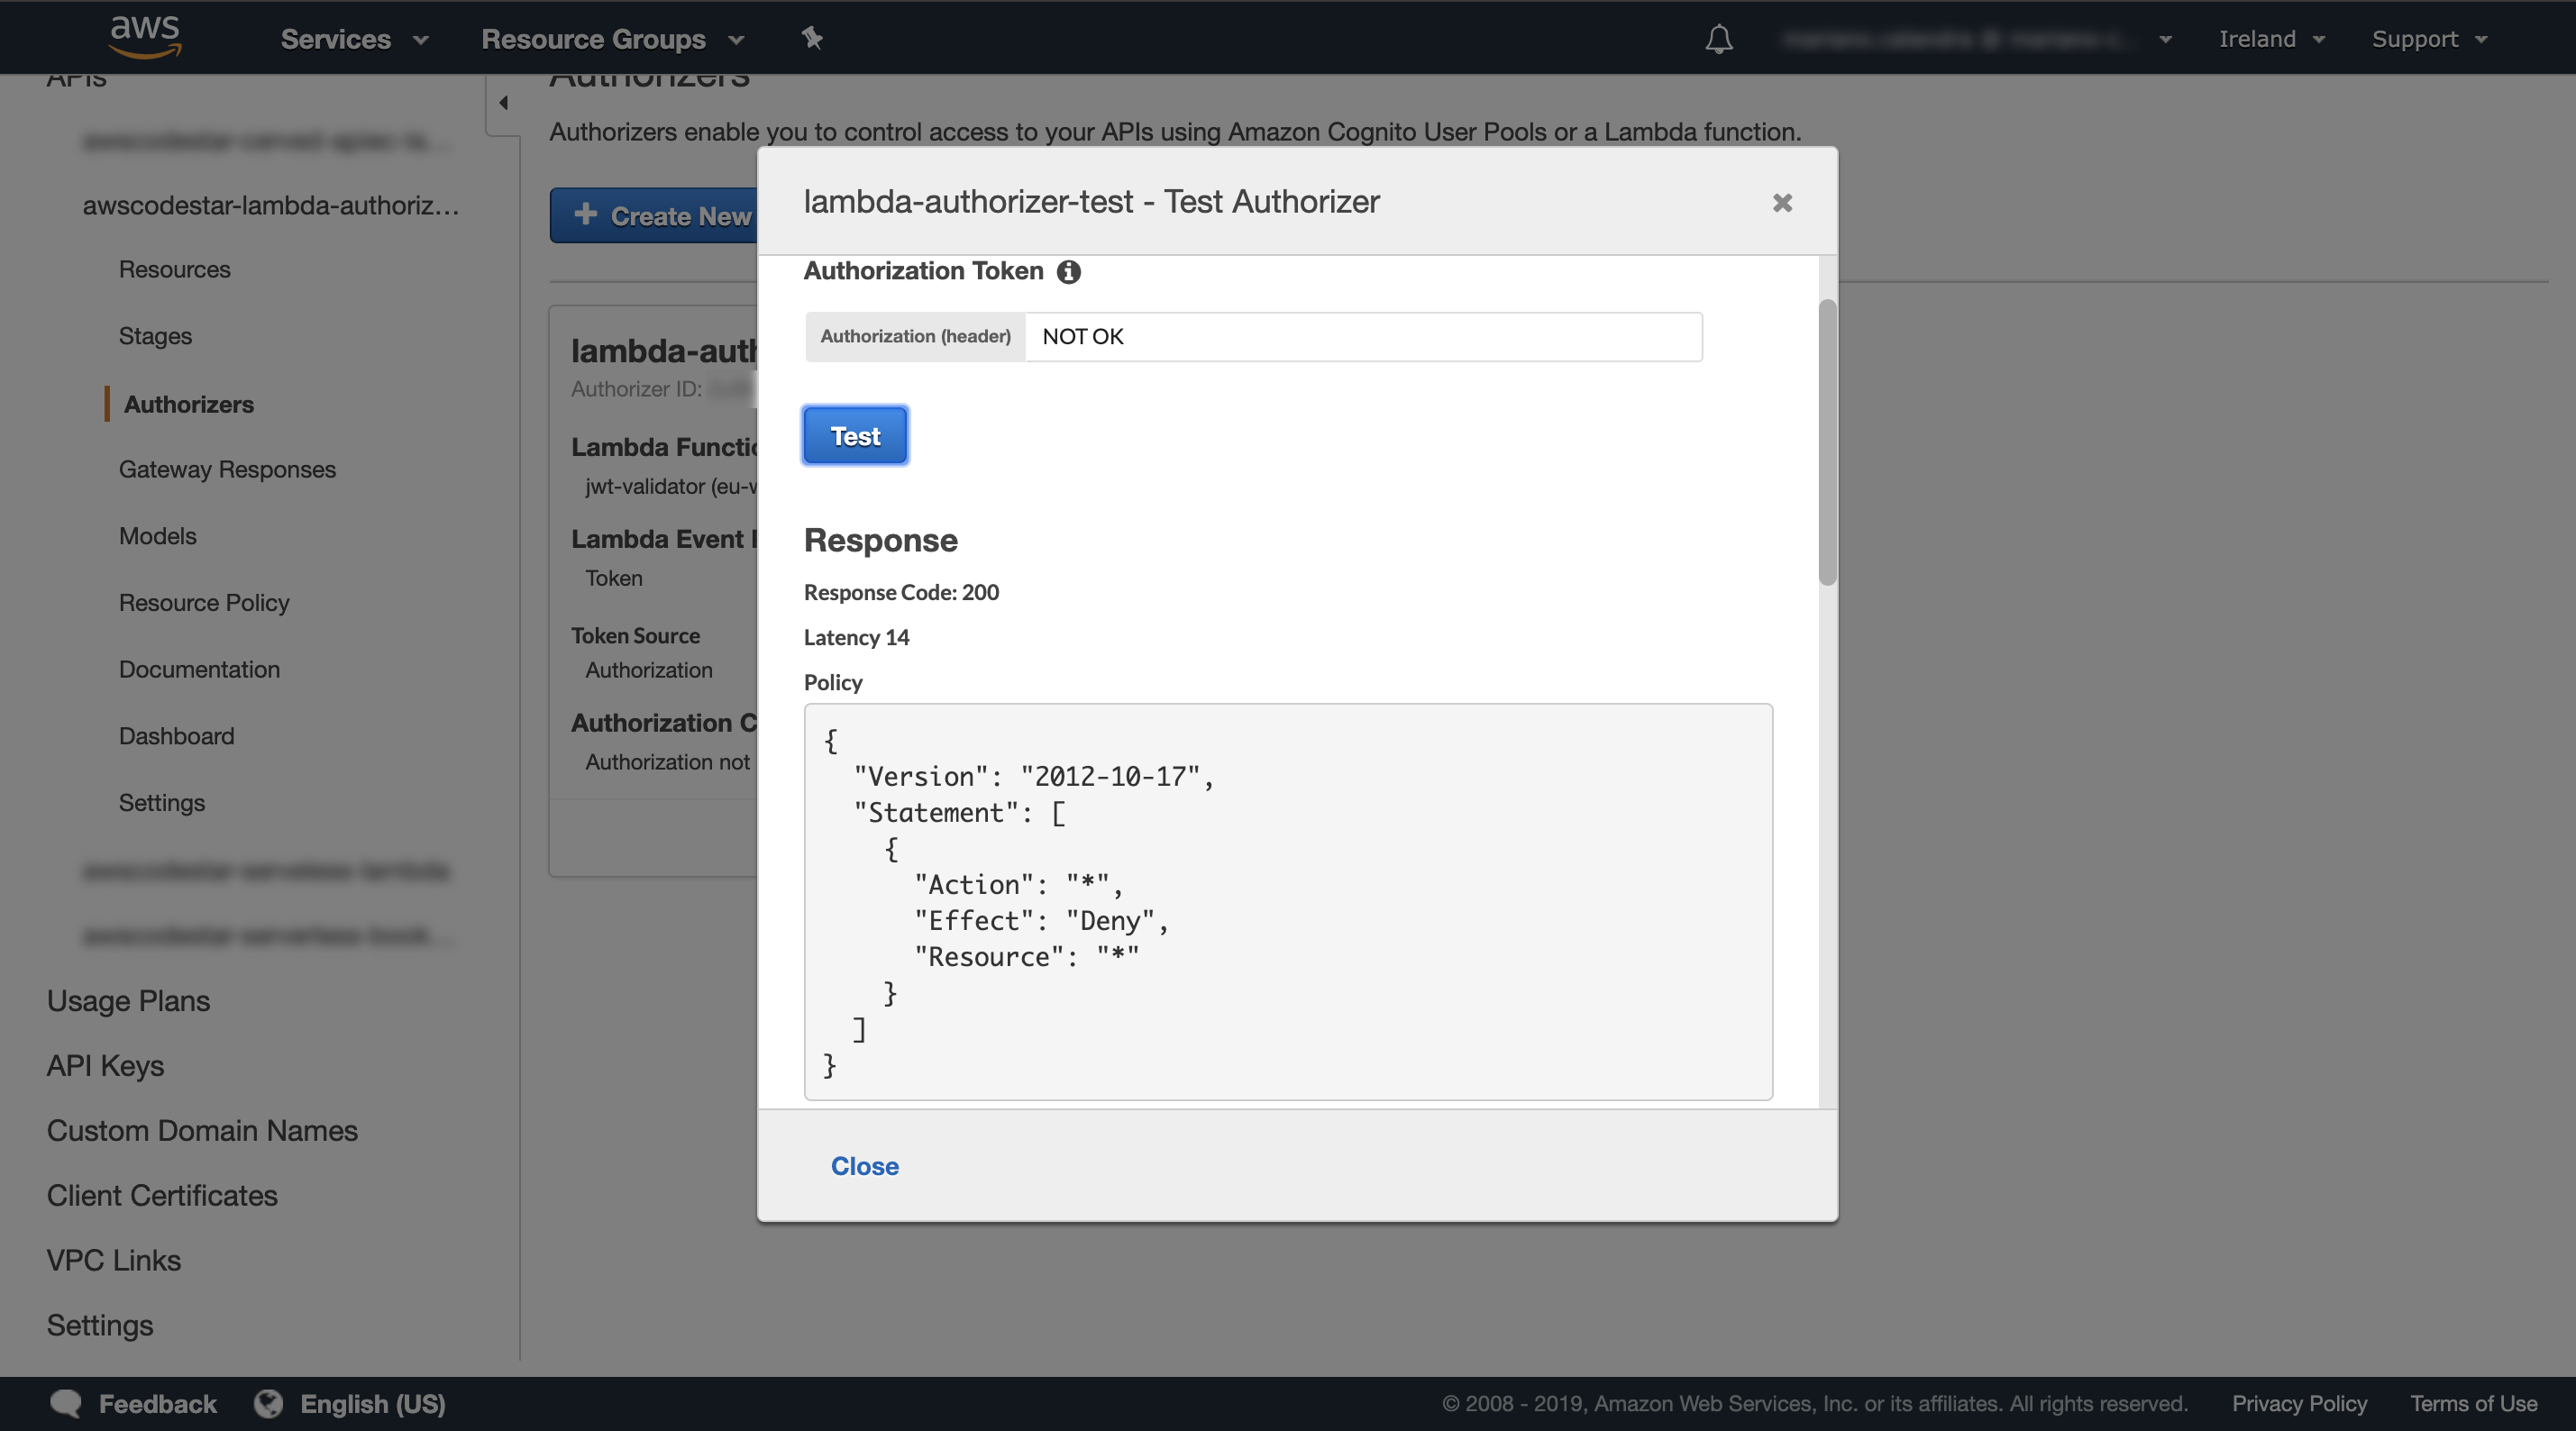 Fig.10–The test result of our authorizer.
Wire everything together
Now that we have everything in the right place, we can finally split the binds between Amazon API Gateway and the backend Lambda introducing the authorizer in the middle.
In the same Amazon API Gateway dashboard click the “Resources” menu item, this will show all the resources associated with this API. Select the HTTP verb that we wish to protect (if we followed the tutorial we only have the root resource / and GET verb).
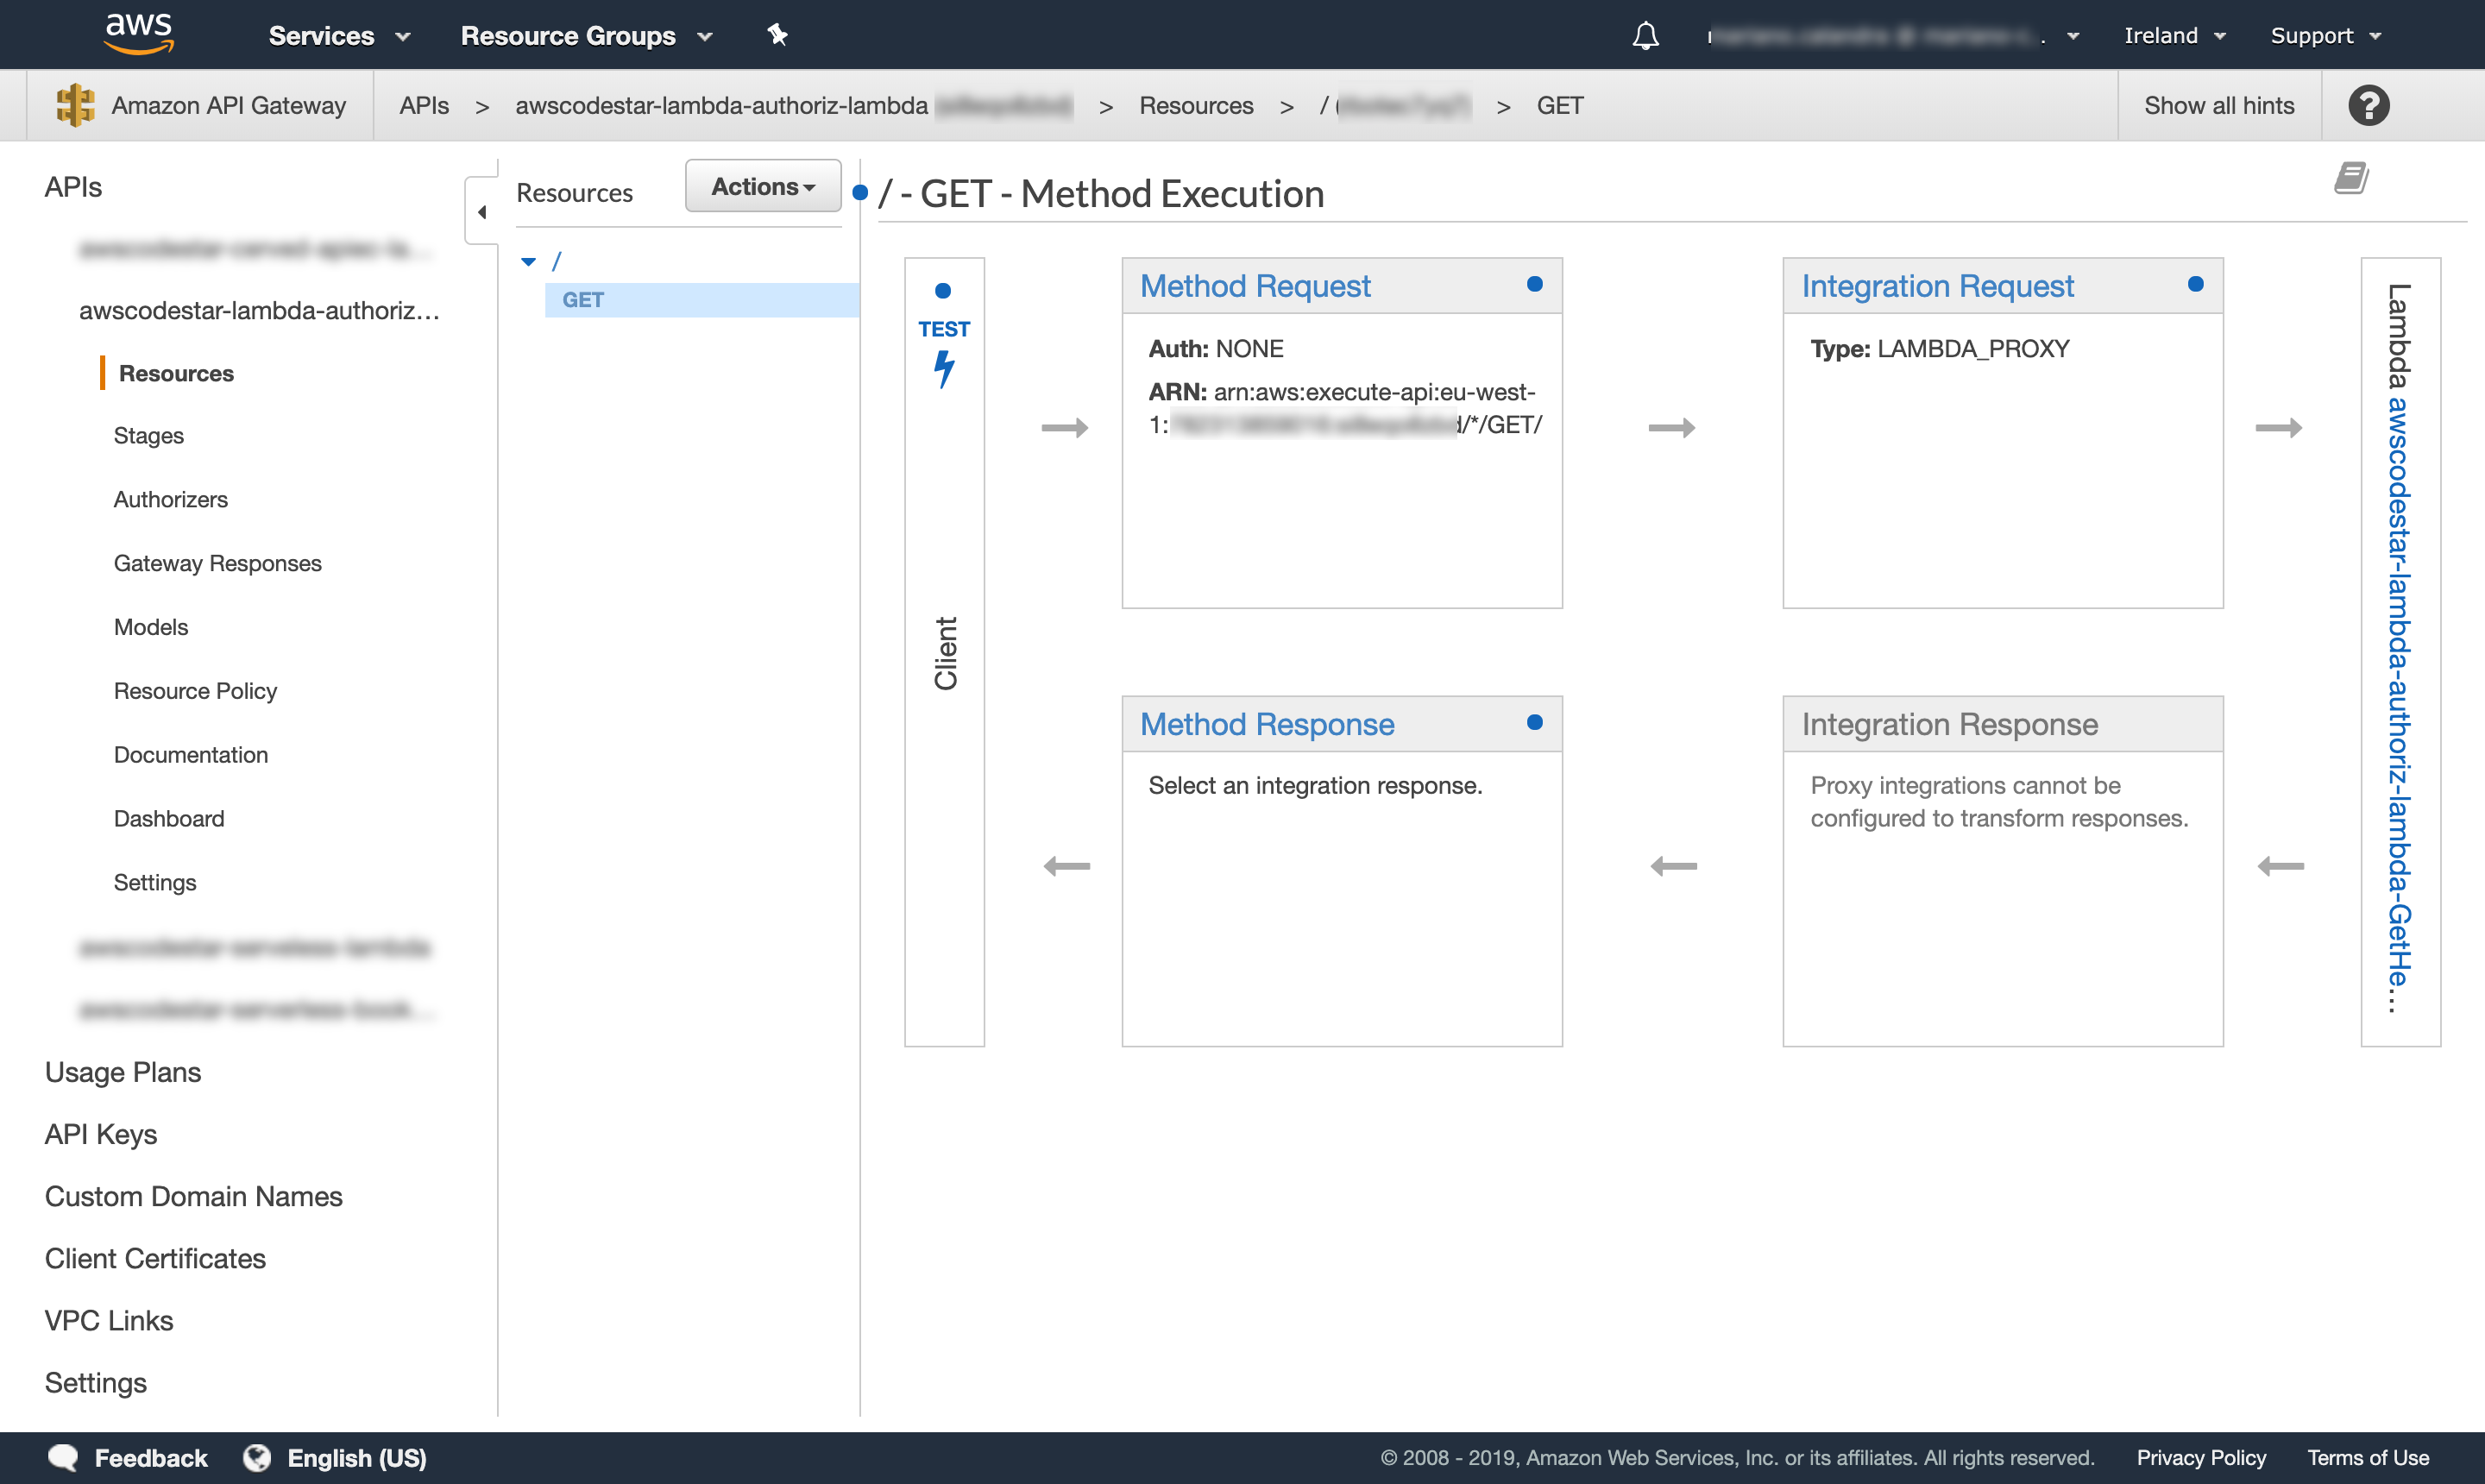 Fig.11 — The API flow, from request to integration.
Click the “Method Request” and when we are ready, in the “Authorization” dropdown select the authorizer created before (in this case lambda-authorizer-test; if we can’t see it, it should be sufficient to refresh the page), then click the ✔ sign to confirm (Fig.11).
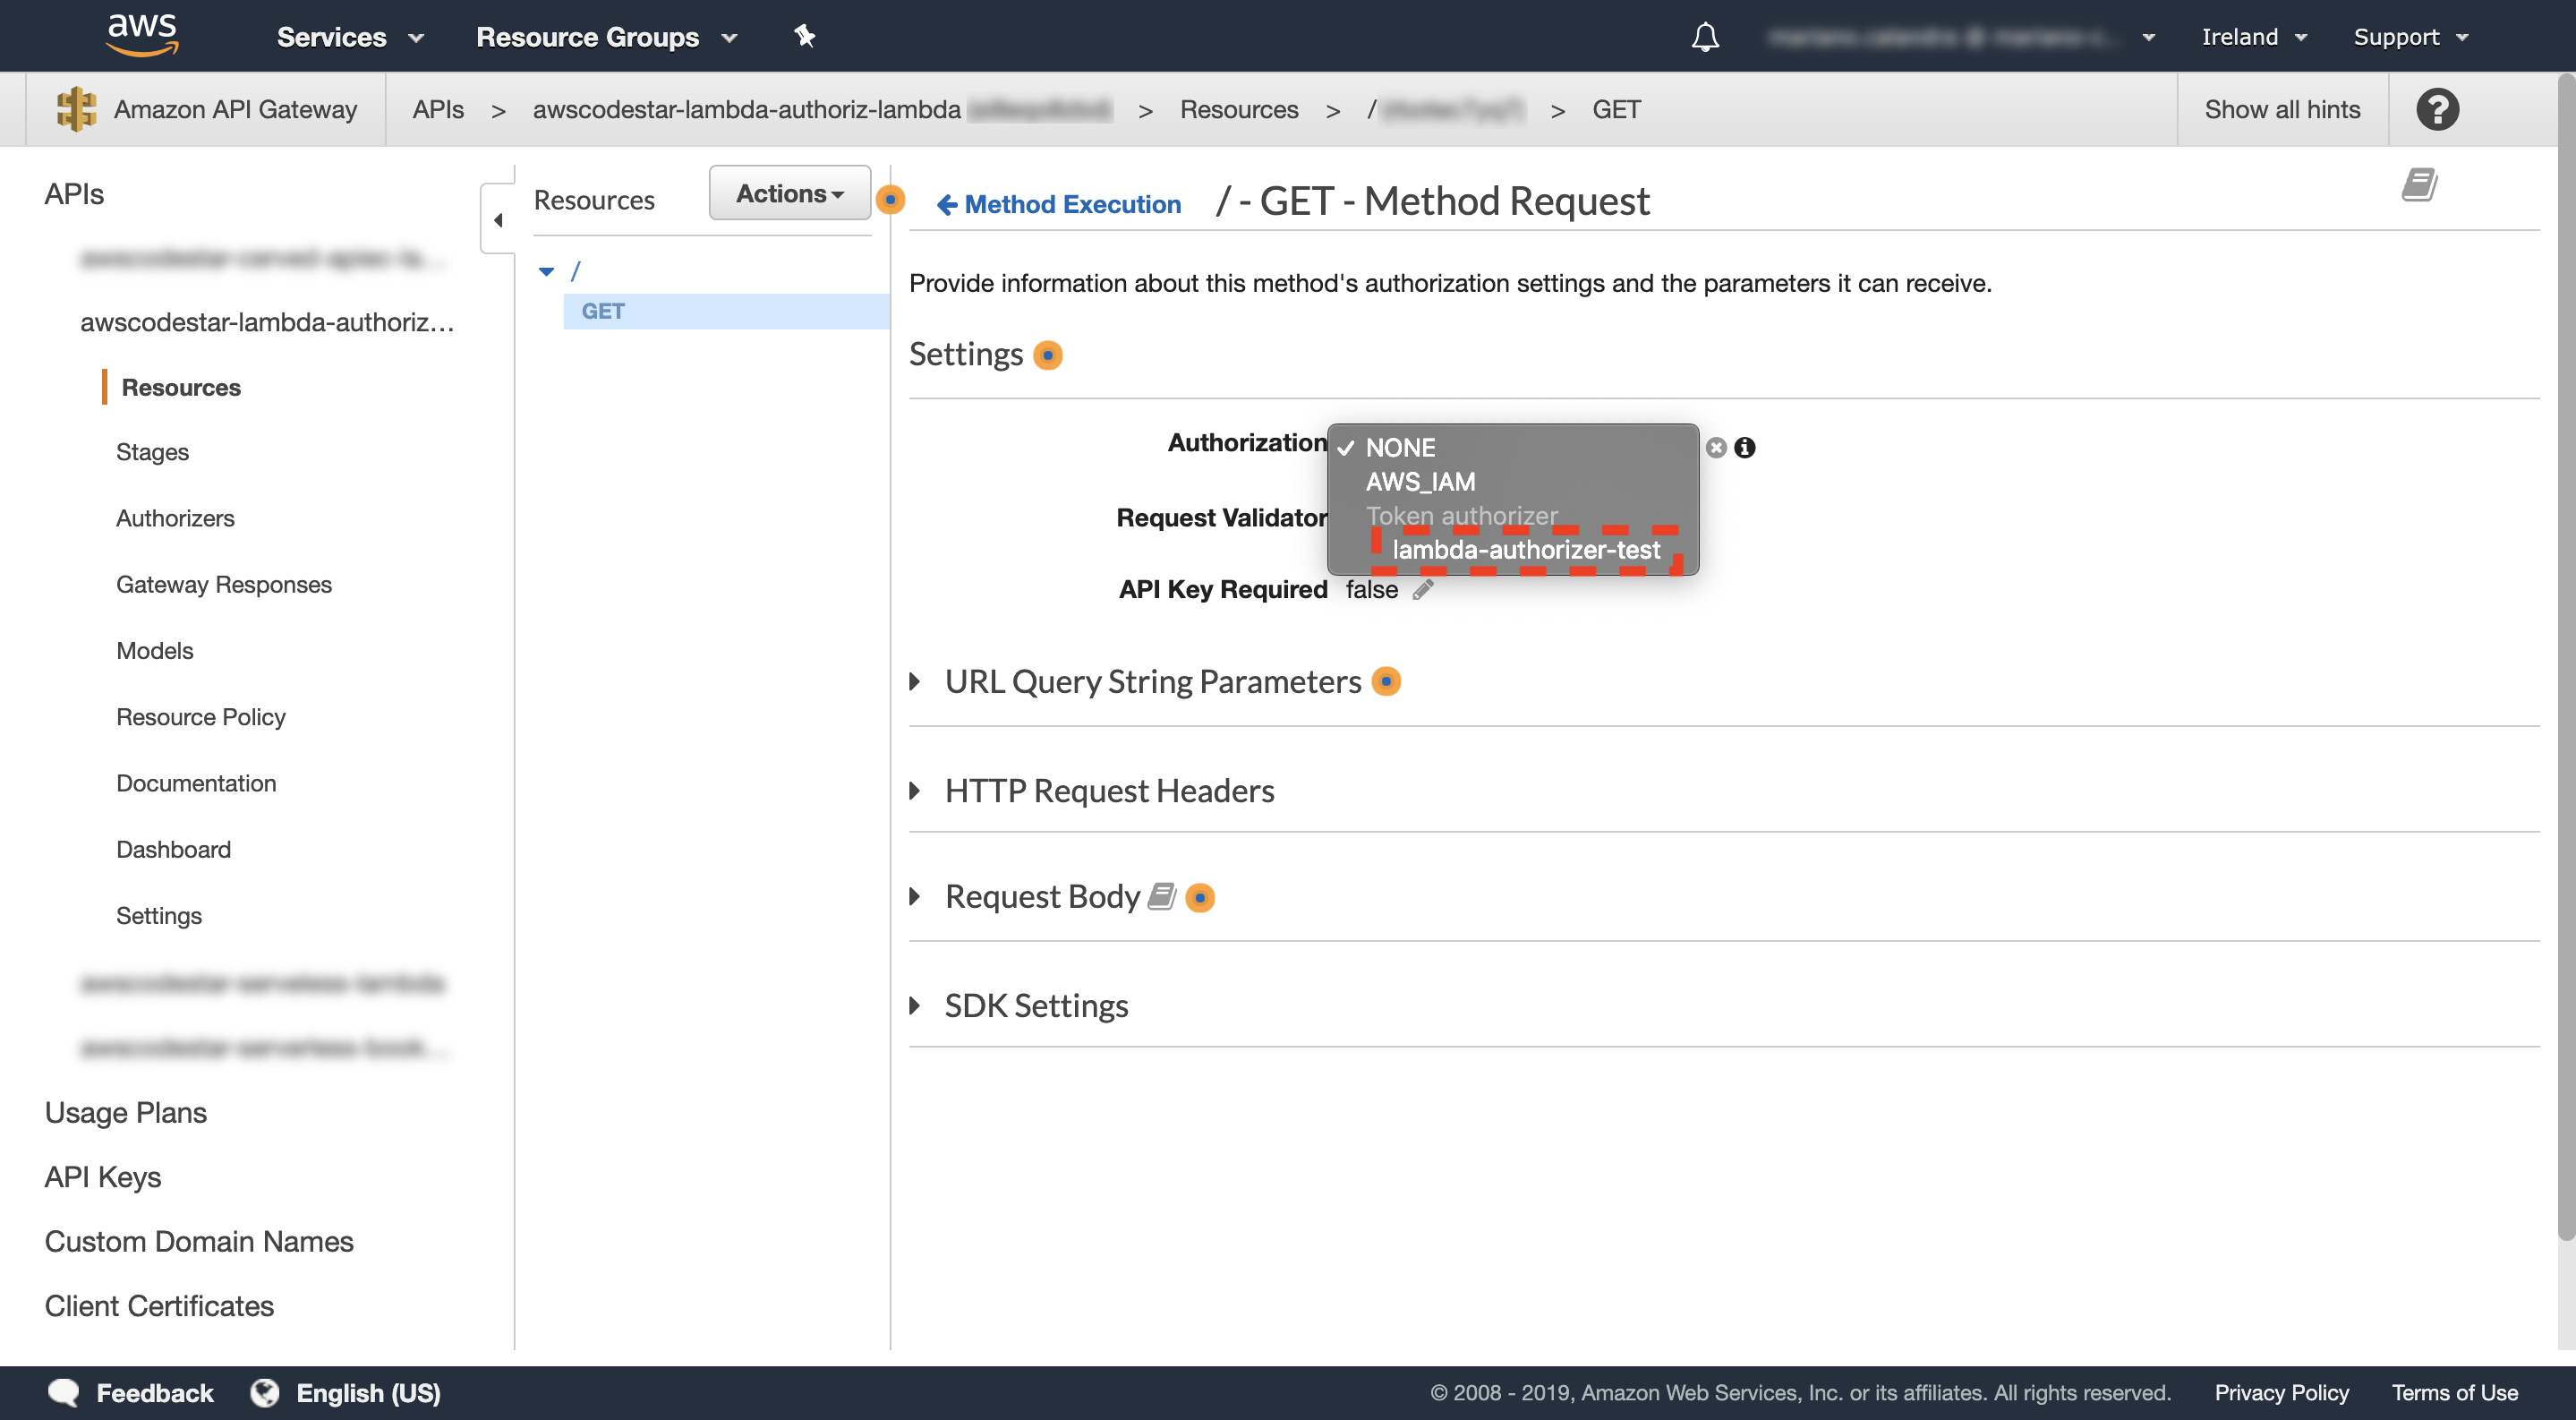 Fig.11–Here we can choose what is the authorizer that we want to use.
Deploy and test the modifications
At this point, we have correctly configured the authorizer but we still need to deploy API to make things working. Click the dropdown “Actions” and then select “Deploy API”. A popup will appear, so we can choose the target stage in which we want to deploy our API (e.g. Stage) and then click “Deploy” (if you need more details, here is an official document by AWS).
If everything will go as expected we would see the “Invoke URL“. Copy that URL and make a request using a tool like Postman, so we can easily fill the Authorization header in the request (Fig.12).
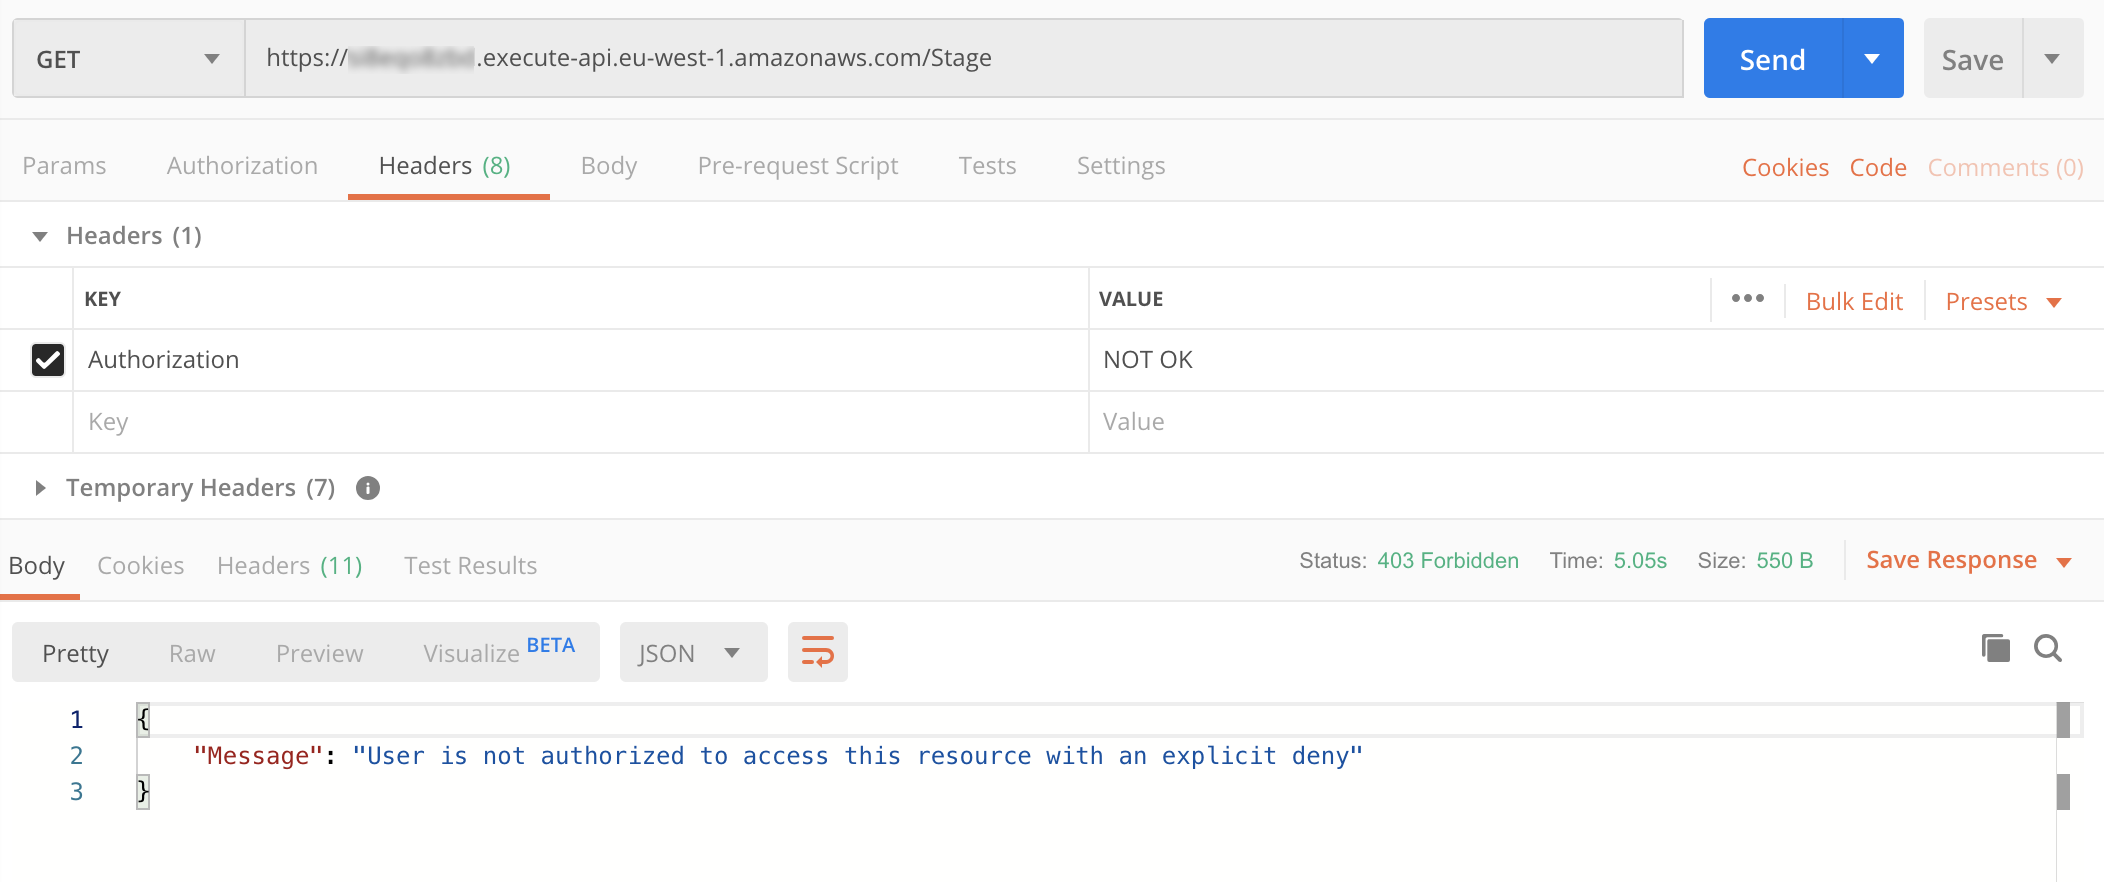 Fig.12–The output that we get calling the protected API with a wrong token.
In this case, we got a 403 Unauthorized error and an explicit message that says:
User is not authorized to access this resource with an explicit deny.
A real authorizer
As said before, the above authorizer is not so secure. We need something smarter, that will be capable of executing the validation steps defined in the previous story. These are:
Decode the token so we can get the JWK endpoint;
Invoke this endpoint and retrieve the exponent and modulus that compute the public key (using the
kidto identify the right key to pick);Compute the PEM;
Verify the token against the PEM;
If no error occurs during these steps an allowPolicy will be returned.
Here a pseudo-code:
function(event) {
    try {
        token = decode(event.authorizationToken)
        jwk = getJwkByKid(token.kid)
        pem = jwkToPem(jwk)
        verify(token, pem)

        return allowPolicy()
    } catch (error) {
        return denyAllPolicy()
    }
}

// CODE HERE
https://github.com/marianoc84/lambda-authorizers-collections
Even though we can still perform further checks this algorithm is much safer than the one seen before.
If you liked this post, please support my work!
Summary
In the first article of this series, we introduced the JSON Web Token (JWT). We looked at its characteristics and why it is so popular nowadays.
In this post, instead, we showcased how a JWT fits into the AWS ecosystem, especially in the Amazon API Gateway. Using this feature, we can split the communication between the HTTP endpoint (e.g. GET /orders) and its backend (e.g. GetOrders Lambda function) introducing a layer for authorization strategies.
We highlighted the steps needed to create and test our first and trivial authorizer. If you want to see code for a complete example check out this GitHub repo.