How to Protect APIs Using Amazon Cognito User Pool
Mariano works in Claranet Italia, where he daily helps companies succeed using cloud and microservices.
He's also an AWS Authorized Instructor and AWS Community Builder.
Amazon API Gateway is a fully managed service that makes it easy to handle REST APIs. The main task of this service is to bind an HTTP endpoint to a given backend service, like a Lambda function.
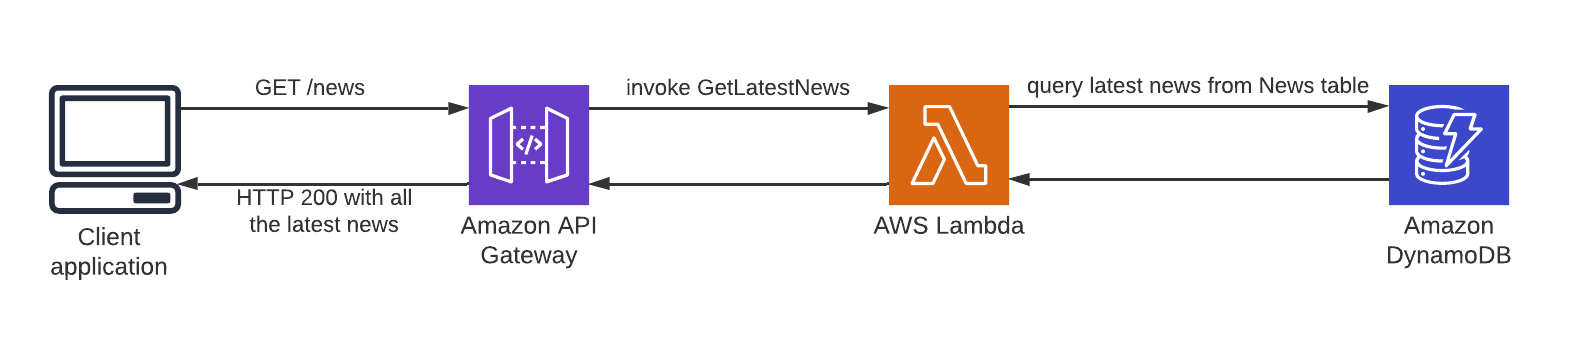 Fig.1 – Business logic exposed as REST API using Amazon API Gateway.
Suppose we are developing a client-side web or mobile application (e.g. Angular, Vue.js, etc.) for a newspaper. On the main page, we want to show the latest news, so we have created a /news resource that, when invoked using the HTTP’s GET verb will trigger the function GetLatestNews. This function might query a DynamoDB table to get the latest news and so returns them as a JSON (fig.1).
Well, now what if instead of calling GET /news, (a public API), an anonymous user tries a DELETE /news? This is a classic scenario in which you want to protect your endpoint from unauthenticated access. In this article, we will see how to achieve this, through few simple stages:
Create a REST API using Amazon API Gateway;
Create a Cognito User Pool;
Protect your API from unauthenticated access;
Test the solution;
Create a REST API using Amazon API Gateway
Amazon API Gateway gives us the opportunity to build REST as well as WebSocket APIs (which is beyond the scope of this article). In the REST scenario, API Gateway acts as a glue between an HTTP endpoint and the related backend (fig.1).
In the following section, we are going to create an API Gateway REST API that will respond to DELETE /news. This endpoint initially unprotected, will be restricted in the next section.
Steps
1. Go into the API Gateway console and choose “Create API” button, then select “REST API”;
2. Now you have to choose a name for your API and the endpoint type (maintain the defaults) then click the blue button “Create API”:
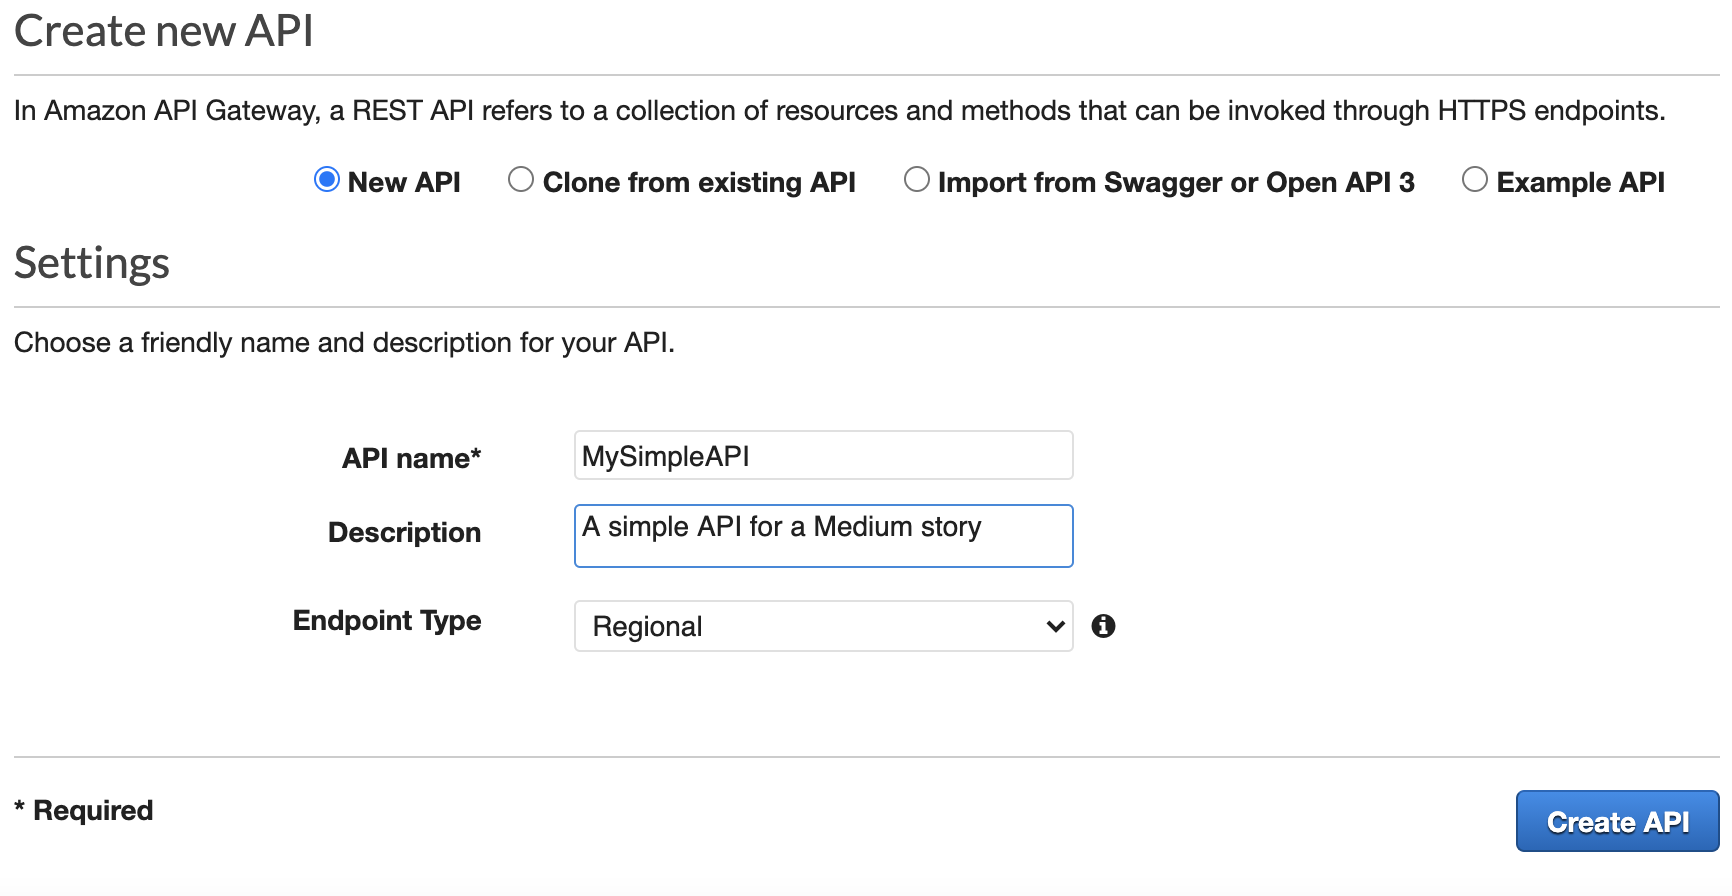 Fig. 2 – Here you can create a completely new API.
3. From the “Action” dropdown ask to “Create resource”, choose a resource name (e.g. news), leave the default in place, then click the blue button “Create Resource”:
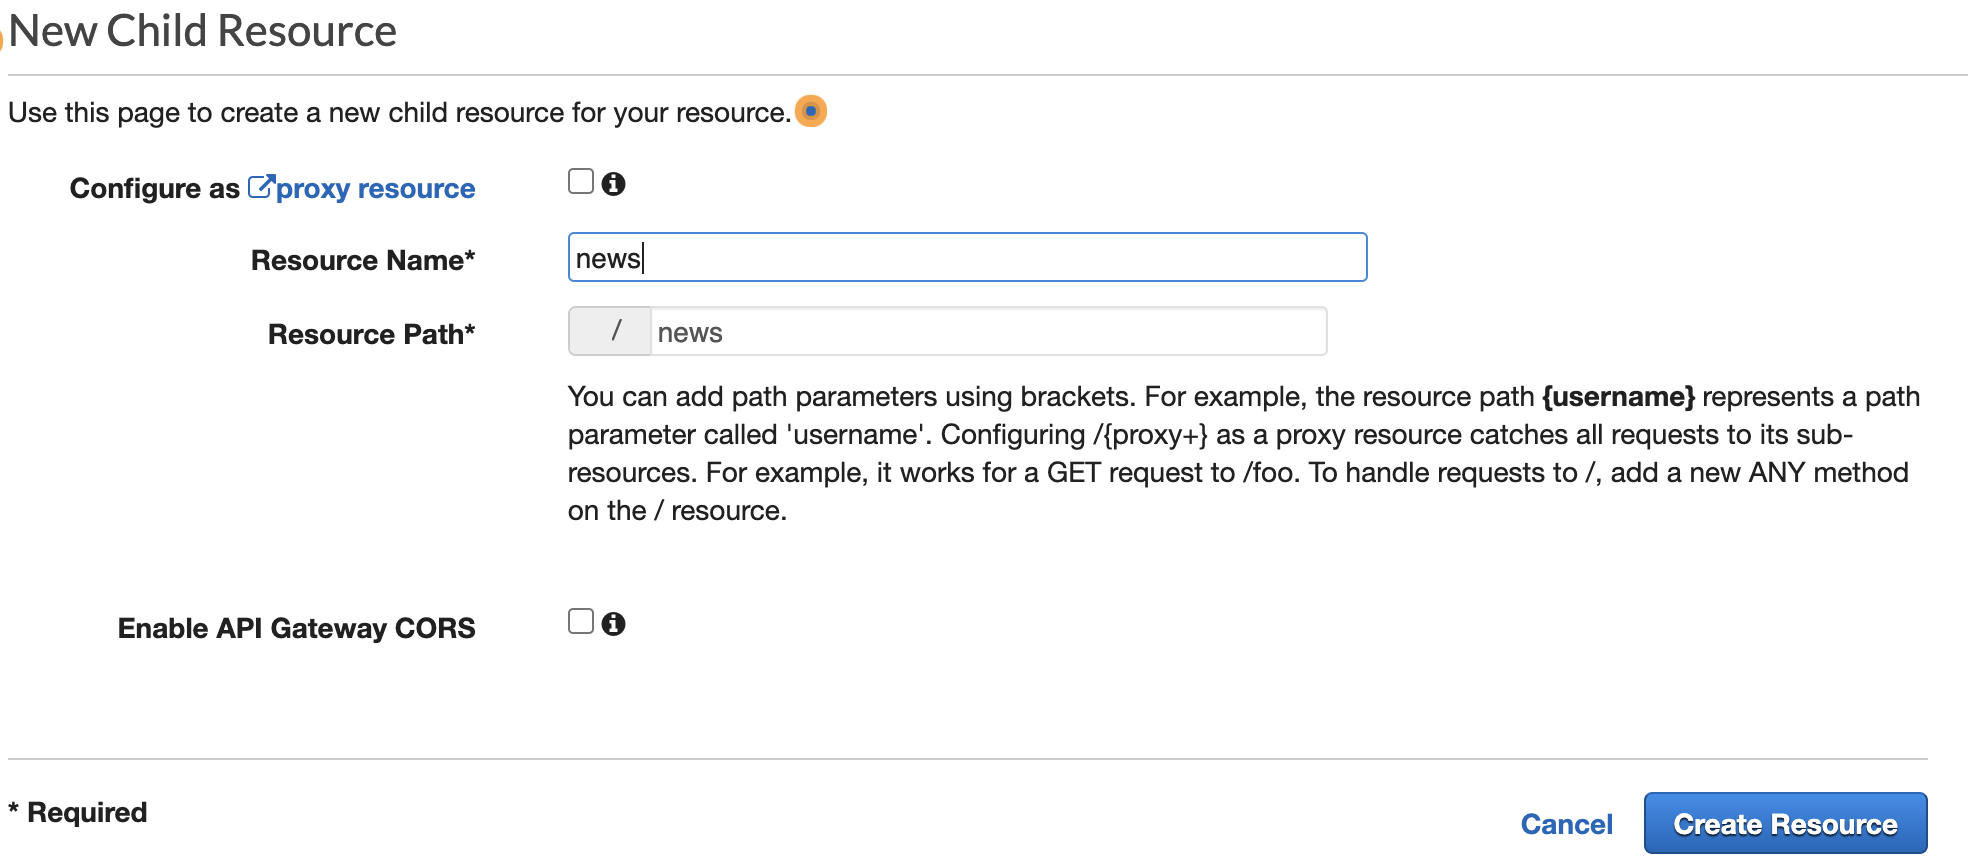 Fig. 3 – The “New Child Resource” screen.
4. In a similar way, from the “Actions” dropdown select “Create Method”, then select an HTTP verb (e.g. DELETE), then click the related checkmark to confirm your choice.
5. In the next screen choose “Mock” as the integration type, then click “Save”.
📝 Note: for the sake of simplicity, we are not providing a backend function for this API, instead a mocked response will be produced. Responses to this API will always be blank, regardless of the input.
6. Now your mock API is ready and we only need to publish it: expand the “Actions” dropdown and click on “Deploy API”, type a name for the stage (e.g. api) and click “Deploy”:
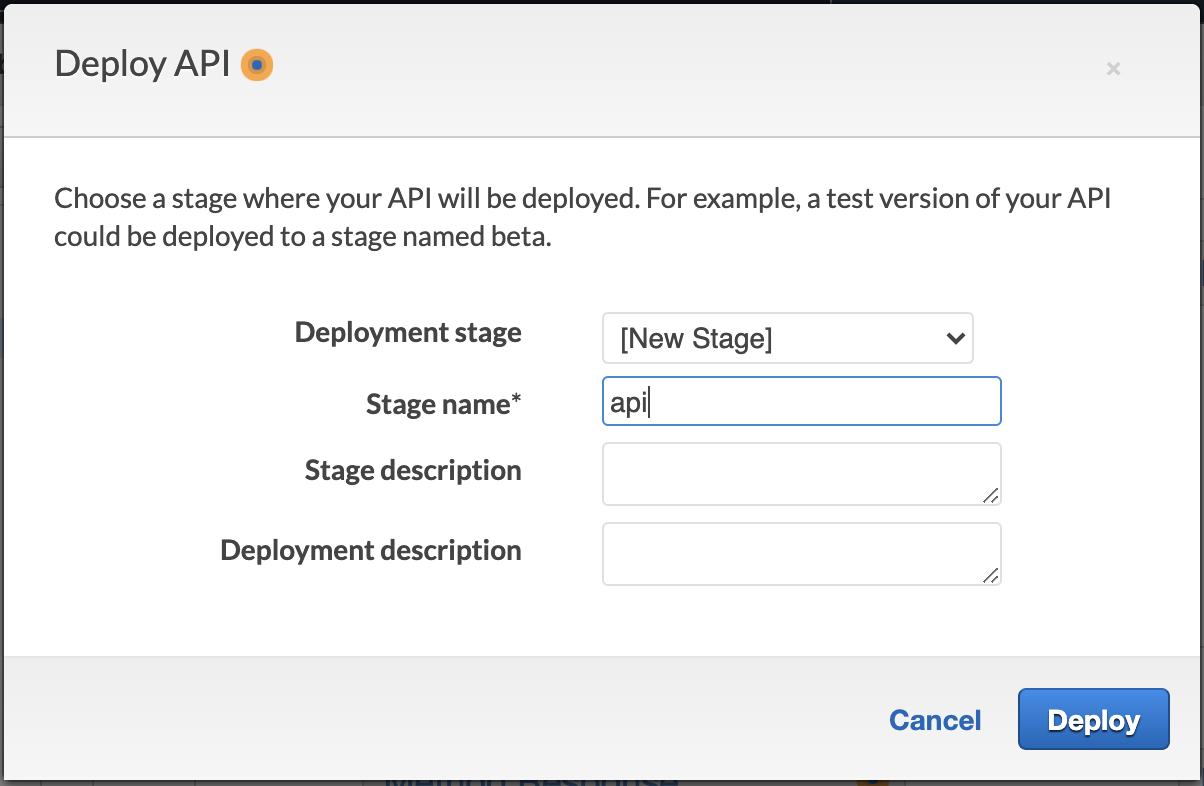 Fig. 4 – API deployment.
If everything is fine, you should see the “Invoke URL” of your API, something like:
https://<api-id>.execute-api.<region>.amazonaws.com/api
and you can use Postman to test the request:
DELETE https://<api-id>.execute-api.<region>.amazonaws.com/api/news
Since there is not any protection mechanism, the HTTP code of this request would be 200, meaning, hypothetically, that an anonymous user could delete all the news from your database!
How can avoid this? How can we protect this API so that only an authenticated user could execute it?
That is where Amazon Cognito comes in.
2. Create a Cognito User Pool
Amazon Cognito is one of the most important and powerful services in the AWS ecosystem. It lets you add user sign-up, sign-in, and access control to your web and mobile apps quickly and easily.
This service comes with two main components the Cognito User Pool and the Cognito Identity Pool (aka Federated Identities).
📚 Further reading: What is Amazon Cognito User Pool and how does it differ from a Cognito Identity Pool
In this article, we will talk about the first, the Cognito User Pool, and how it can be used to protect REST APIs developed using Amazon API Gateway.
A user pool is a user directory in Amazon Cognito. With a user pool, your users can sign in to your web or mobile app through Amazon Cognito […]
Since the Cognito User Pool is essentially a user directory, it can be used to assess, during a login for instance, if the provided user’s credentials are valid. In this case, behind the scenes, Cognito will issue JSON web tokens (JWT). Two of the most important are:
the id token with the information about user identity;
the access token that contains authorization facts about the authenticated user;
Suppose you are at the airport. The id token is your passport (i.e. something that is used by airport security to assess who you are – authentication), while the access token is your boarding pass (i.e. something that is used by airport security to assess if you can board on a given plane – authorization).
For security reasons these tokens can be verified for tampering and come with a predefined duration; when this duration is expired we need to refresh them.
📚 Further reading: Why do we need the JSON Web Token (JWT)?
Steps
7. Open the Cognito console, then select “Manage User Pools”, then “Create a User Pool”.
8. Choose a name for the User Pool (e.g. MySimpleUP) then click “Review defaults”: here you can confirm all the default settings unless you want to change something like username, password policy, etc.
Congratulations, you’ve just created a Cognito User Pool.
9. In Cognito jargon, an app is an entity that has permission to call User Pool’s APIs (e.g. sign-up, sign-in, etc.). To interact with this app, you need to create an app client.
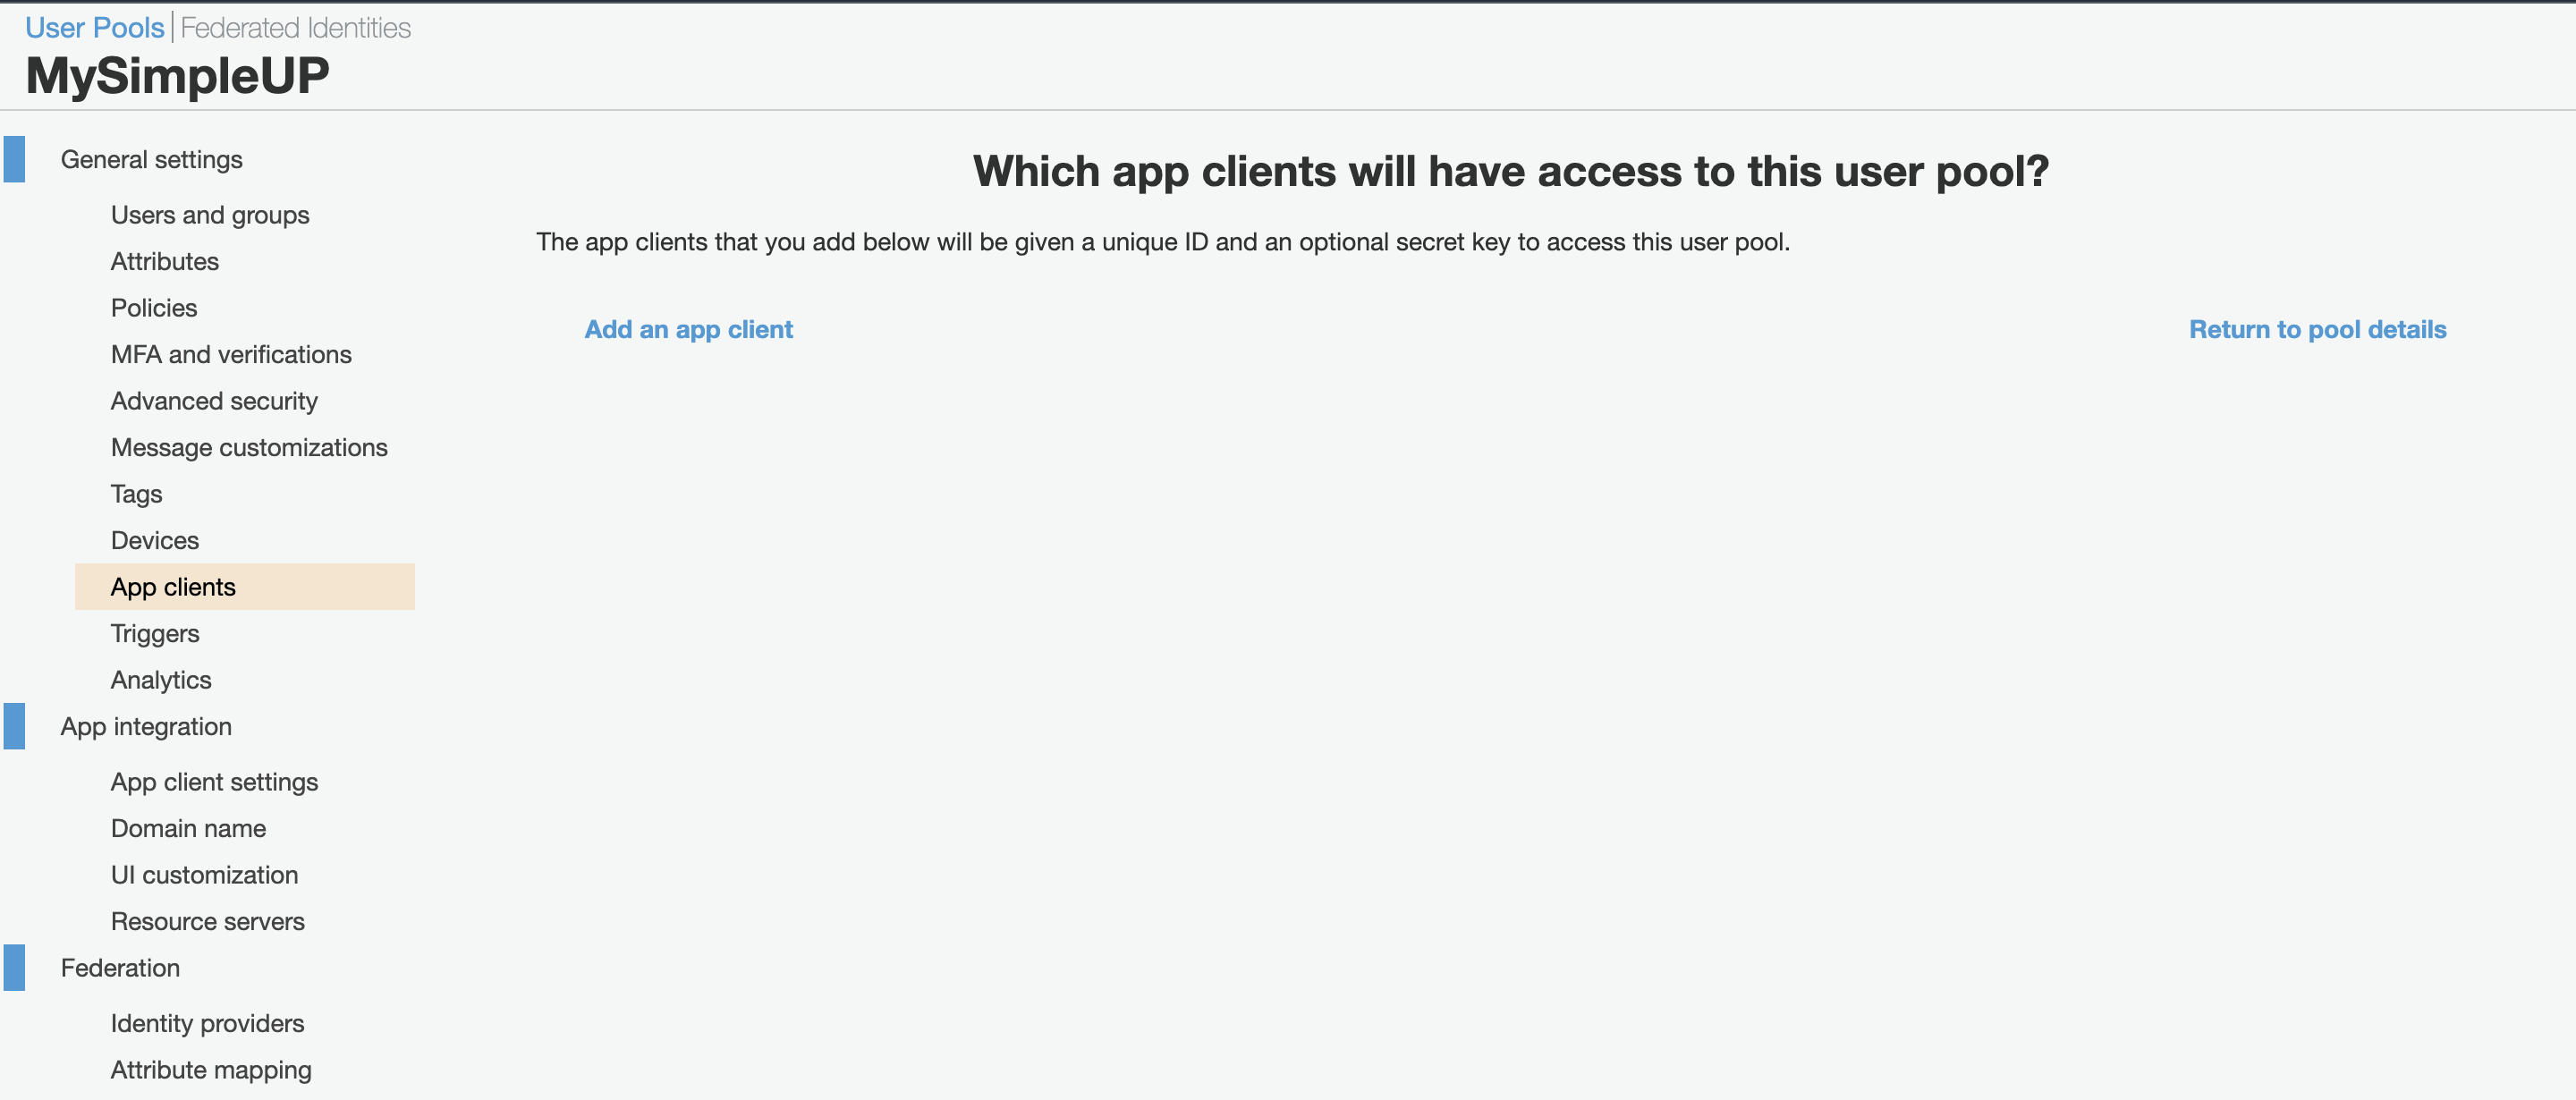 Fig.5 – Create an app client.
From the dashboard of your User Pool click on “App clients”, then “Add an app client”.
10. Now you can choose a name for your app client, (e.g. MySimpleAppClient) and if you wish to set a different duration for the tokens.
Here it is important to uncheck the option “Generate client secret”; because we will have a client-side web application we won’t use a secret because this is easily readable using common browser’s developer tools.
As Auth Flows we will uncheck everything but ALLOW_USER_PASSWORD_AUTH and ALLOW_REFRESH_TOKEN_AUTH and leave any other parameter on default.
If everything goes as expected you should be able to see an “App client id”.
11. Now we have to bind the User Pool with the App client. From the left menu, click “App client settings”.
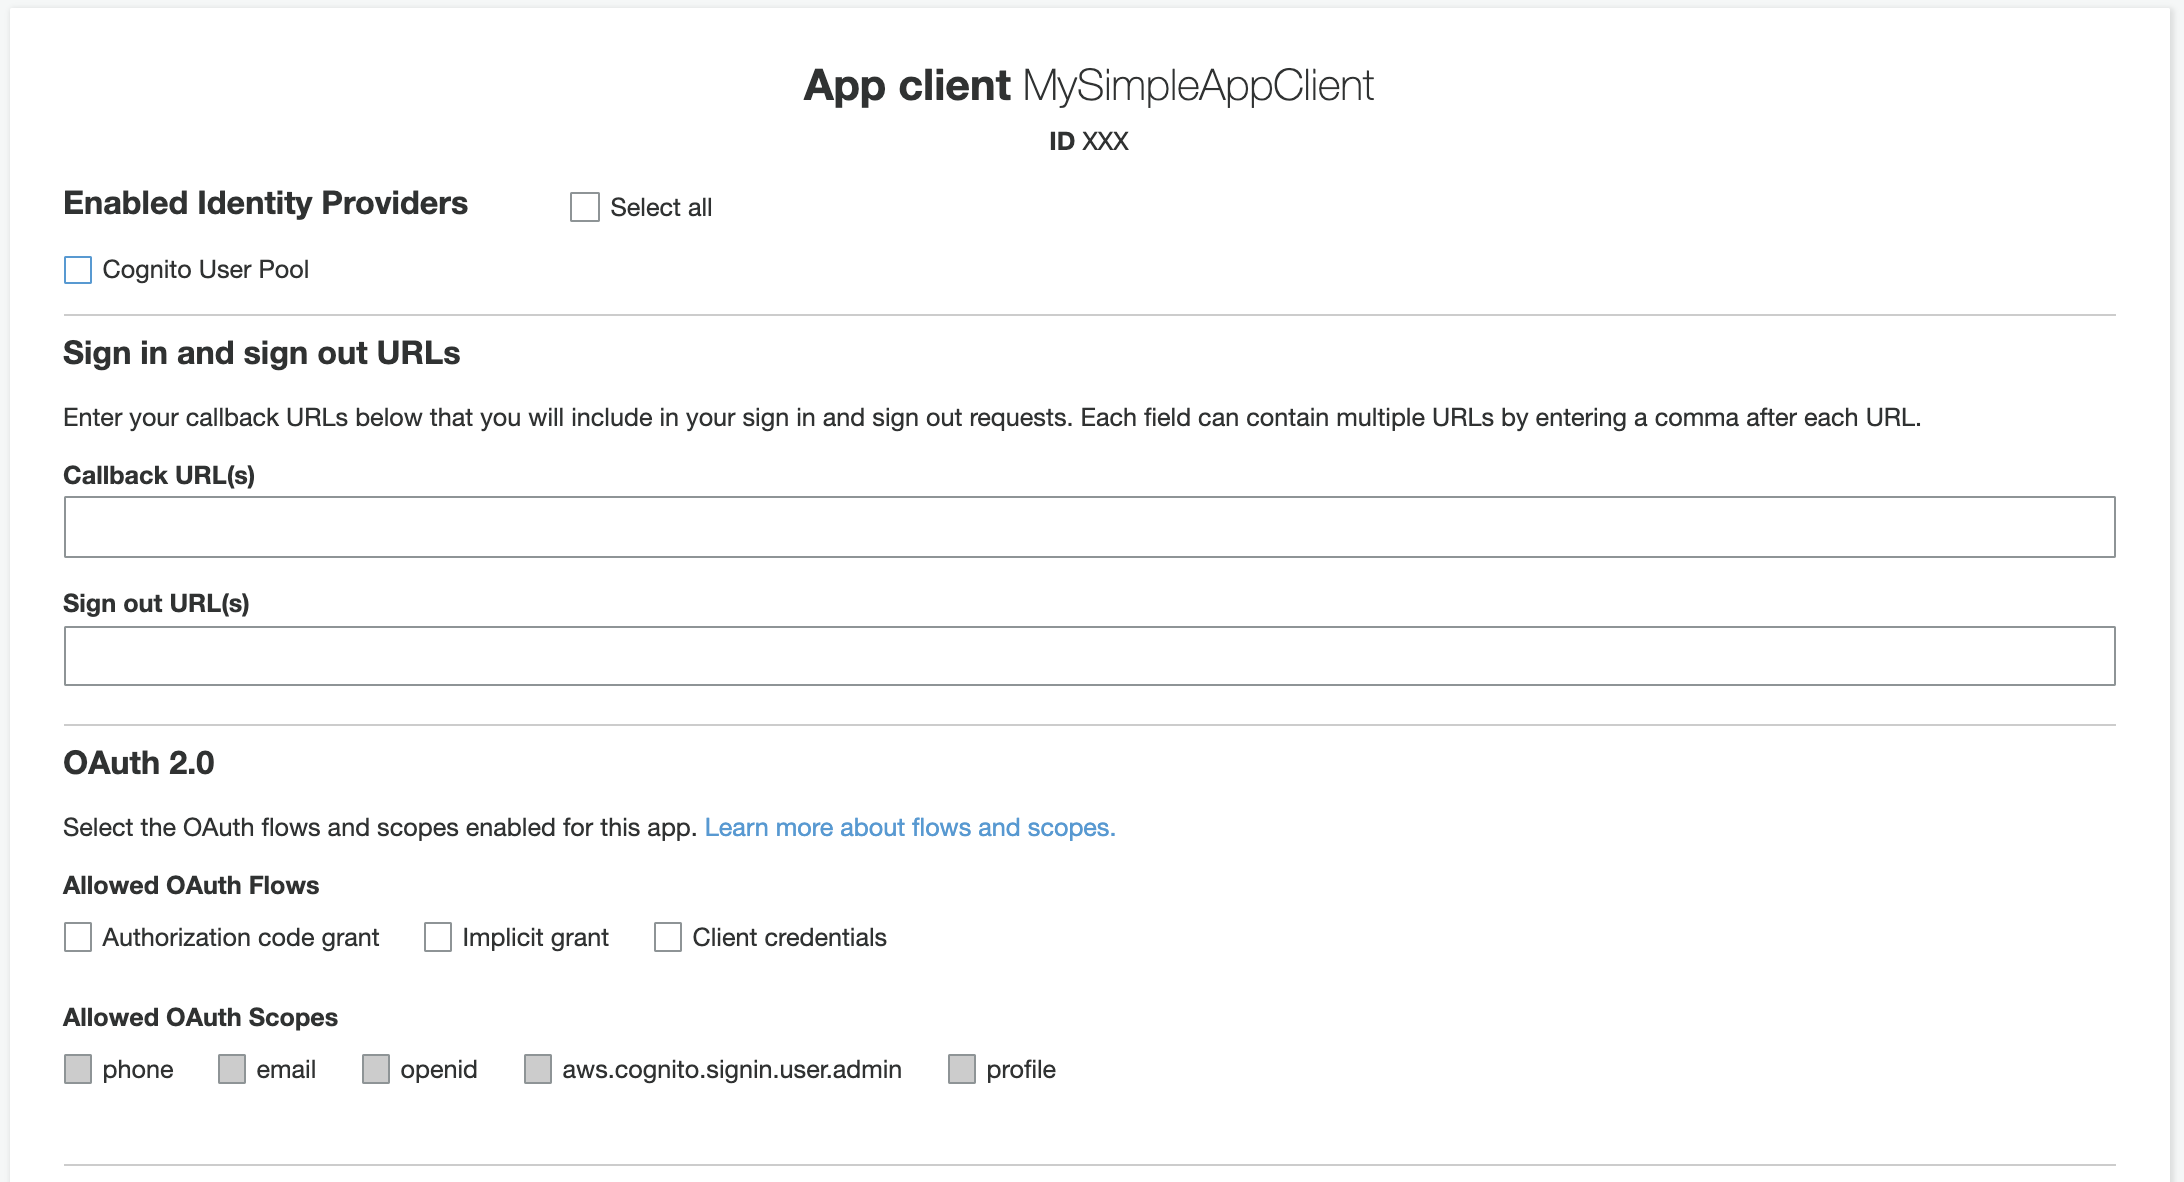 Fig.6 – The “app client settings” screen.
12. From the “App client settings” screen (fig.6) select “Cognito User Pool” as an enabled Identity Provider.
Then you have to set a “Callback URL”, that is the URL to which a user will be redirected after a successful login. As we are just experimenting, you could use http://localhost.
In the “OAuth Flows” section, select “Implicit Grant”. In this way, we are telling Cognito to return tokens after each successful login, then check all the “Allowed OAuth Scopes” (i.e. the access privileges that can be requested for tokens).
🤓 Pro-note: In the “Authorization Code Grant” flow, Amazon Cognito will return a code, so we will need a custom application on the backend to exchange the authorization code for tokens. The “Client credentials” flow instead is used for machine-to-machine comunication. We won’t use these flows.
3. Protect your API from unauthenticated access
The main task of this Amazon API Gateway is to bind an HTTP endpoint to a given backend though this service is much more advanced than this. For instance, we could easily add an authorizer to an API Gateway resource, so any request to that resource will be checked for authentication.
In this way, the user that wants to request a given API has to provide some information to assess its identity. One of the most common ways to proceed is providing the token as the value of the Authorization header. In this scenario, the API endpoint should validate the token and verify if it is valid.
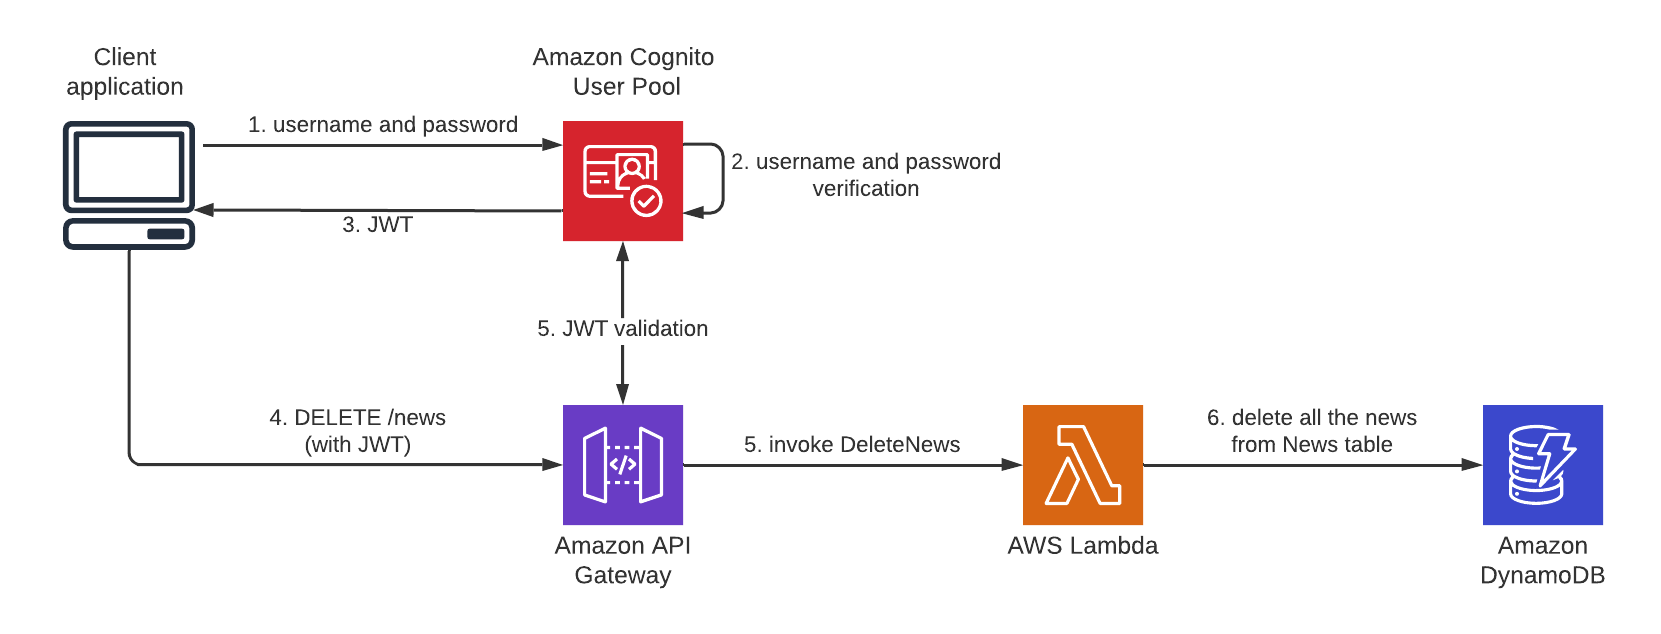 Fig.7– Login and JWT validation flow.
Luckily for us, API Gateway has all the necessary tools to validate the provided token. We only need a few more steps.
Steps
13. In the API Gateway dashboard, select the API that we want to protect and, from the left menu, select “Authorizer”, then “Create New Authorizer”:
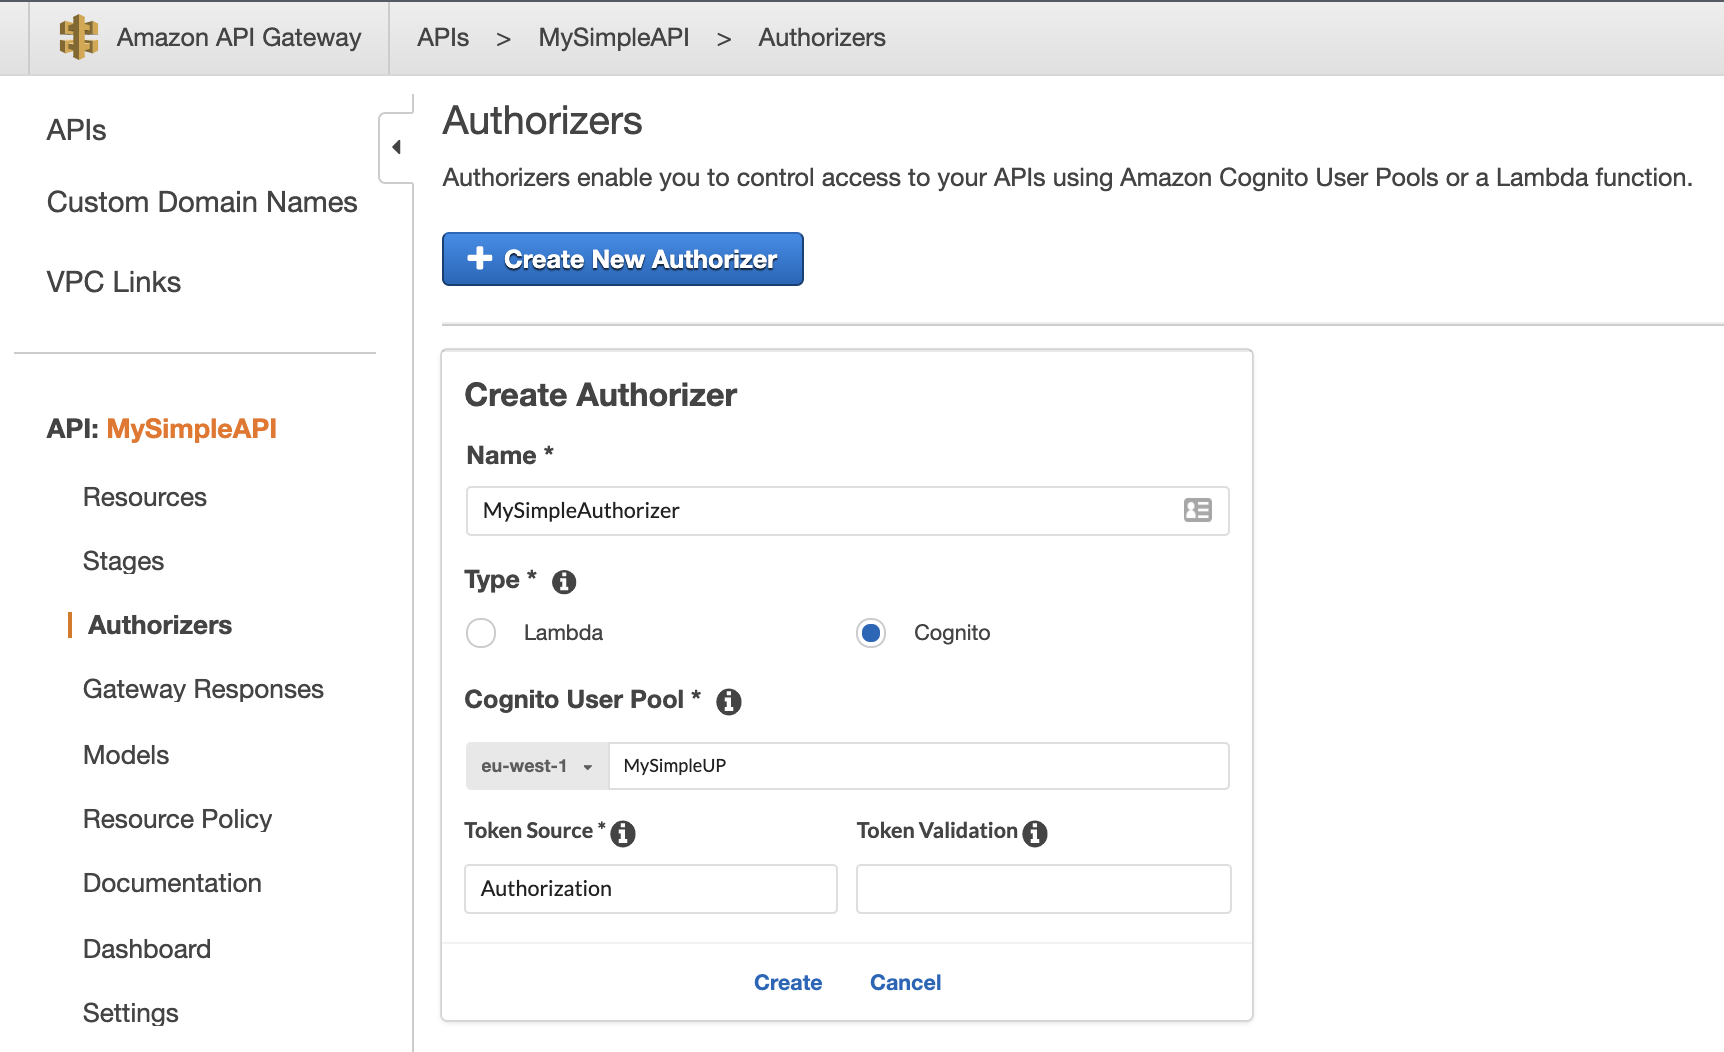 Fig.8 – API Gateway authorizer creation.
Choose a name, a type (i.e. “Cognito”), then, in “Cognito User Pool” start to type the name of the user pool created previously.
🤓 Pro-Note: You could protect an API Gateway using a Lambda function. This is beyond the scope of this article, but if you are curious you can read more here.
In the “Token Source” specify the HTTP header that you will be using to send tokens (e.g. Authorization, that is a de-facto standard); “Token Validation” supports a regular expression but can be left blank for now, then click “Create”.
14. From the left menu, select “Resources”, then select the endpoint that you want to protect (i.e. DELETE /news), then “Method Request”.
15. In the following screen (fig.9), click on the small pencil icon near the “Authorizer” field (currently set to “NONE”) and, from the dropdown, select the User Pool Authorizer just created (if AWS_IAM is the only available authorizer refresh the page and retry), then click on the checkmark to confirm.
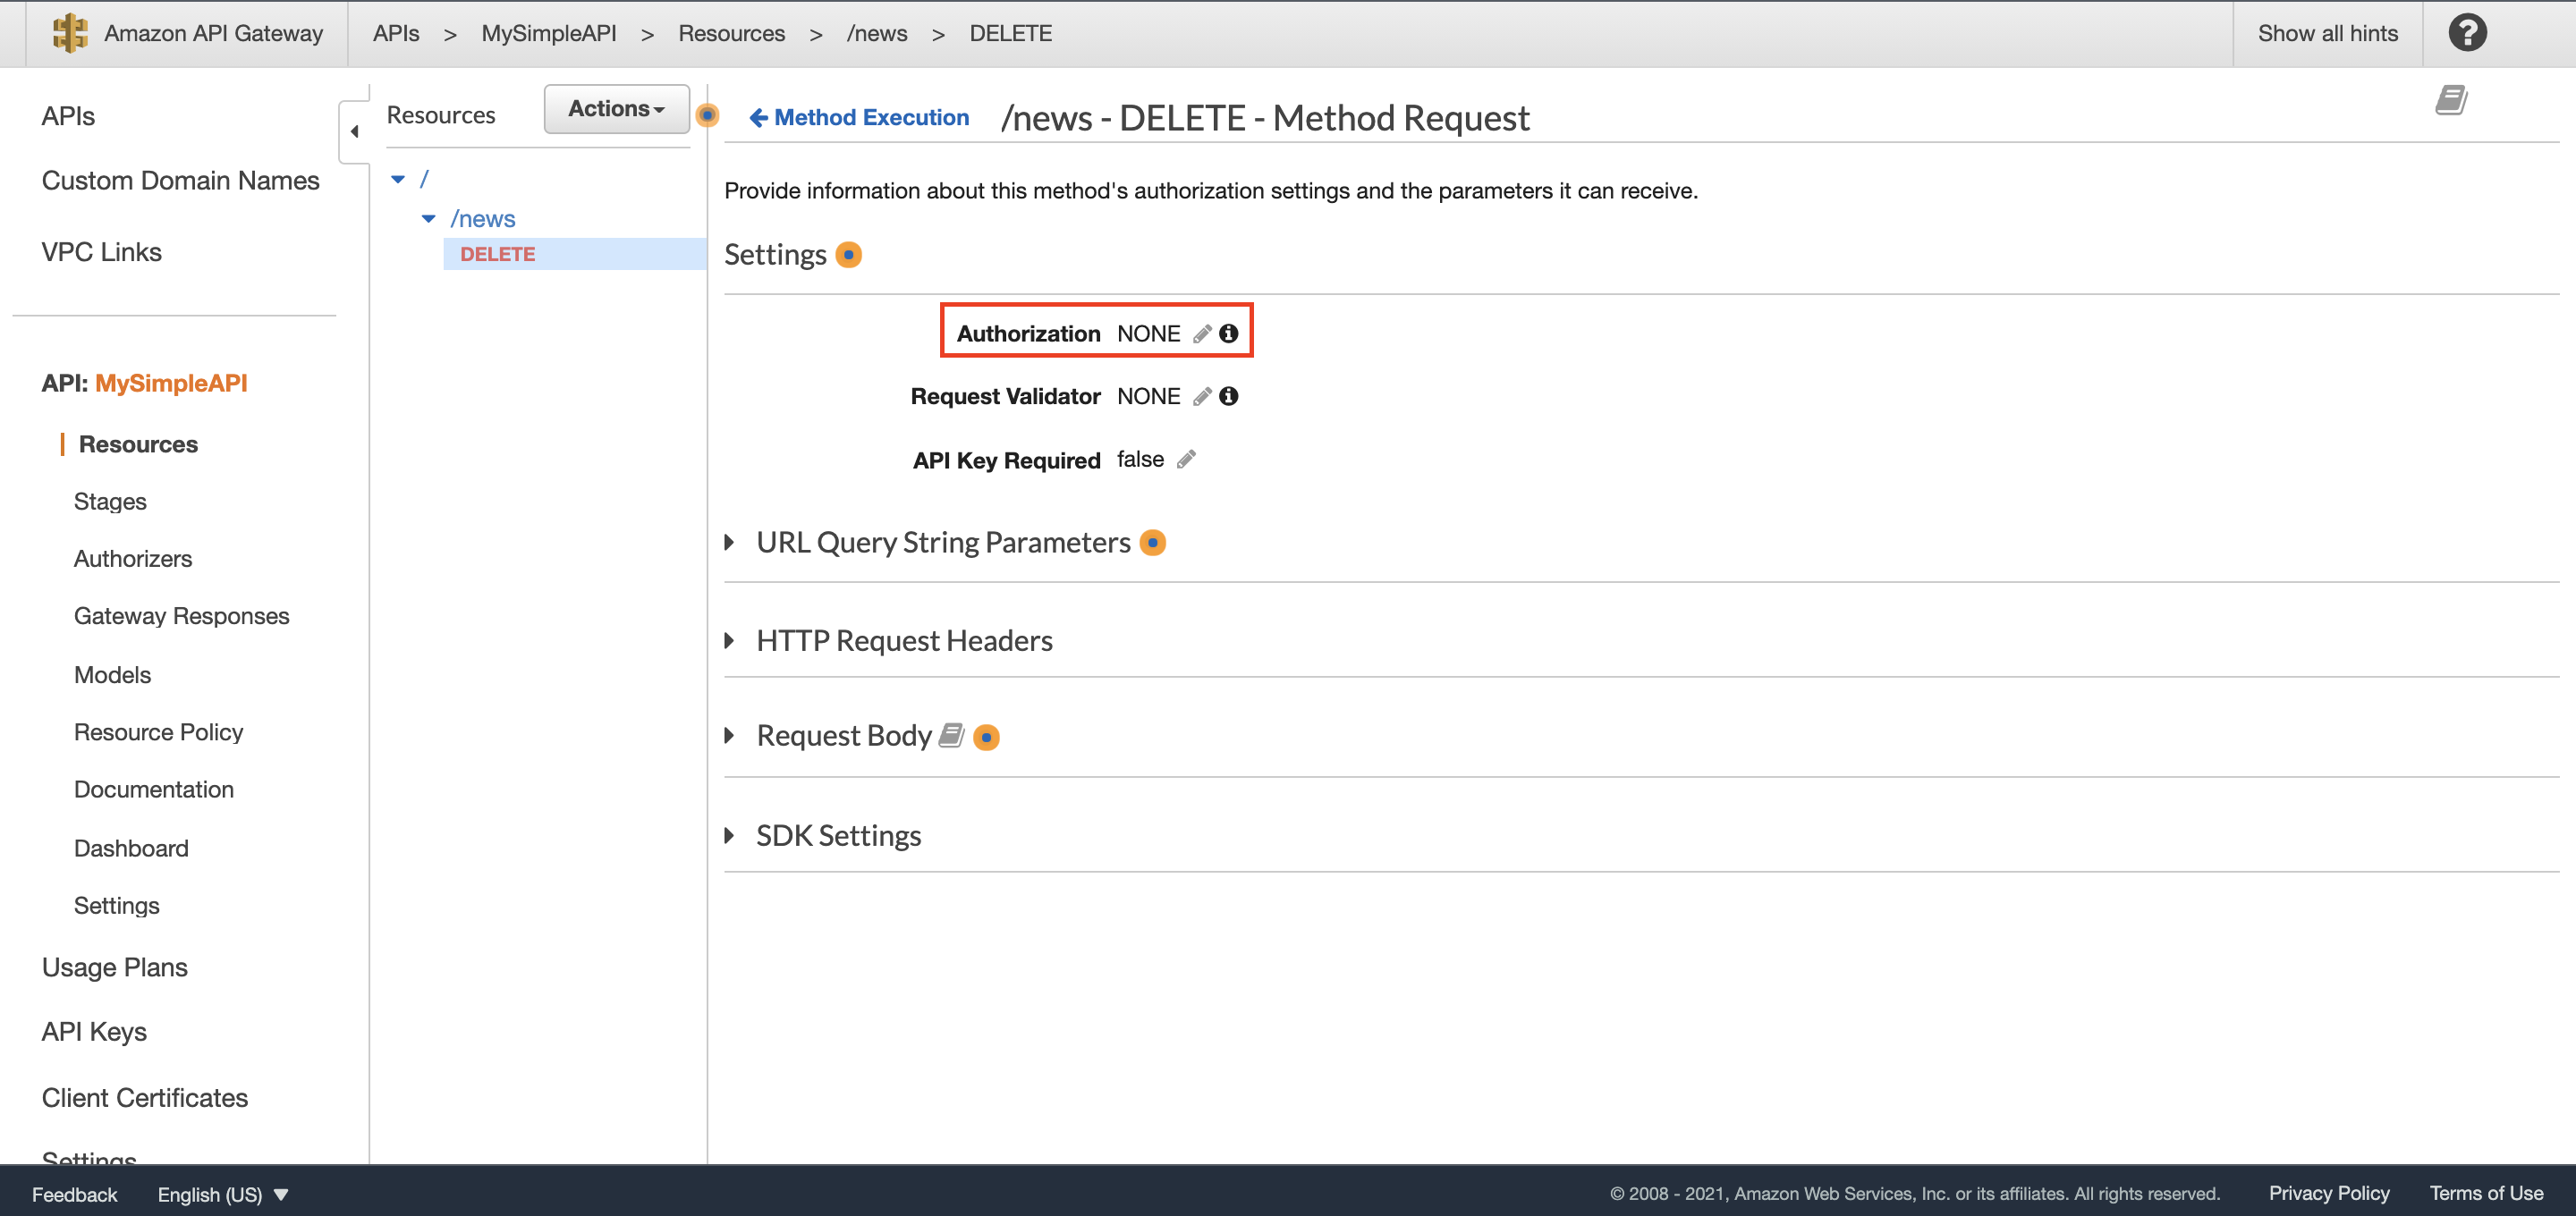 Fig.9– The association between an authorizer and a resource.
16. At this point to make modifications publicly available, you have to redeploy API (i.e. “Actions” then “Deploy”).
If everything goes as expected the API now should be protected.
Give it a try!
4. Test the solution
Now, if an anonymous user wants to delete all news, requesting the DELETE /news API, they shouldn’t get an HTTP 200 (like before) but a more reassuring HTTP 401: unauthorized.
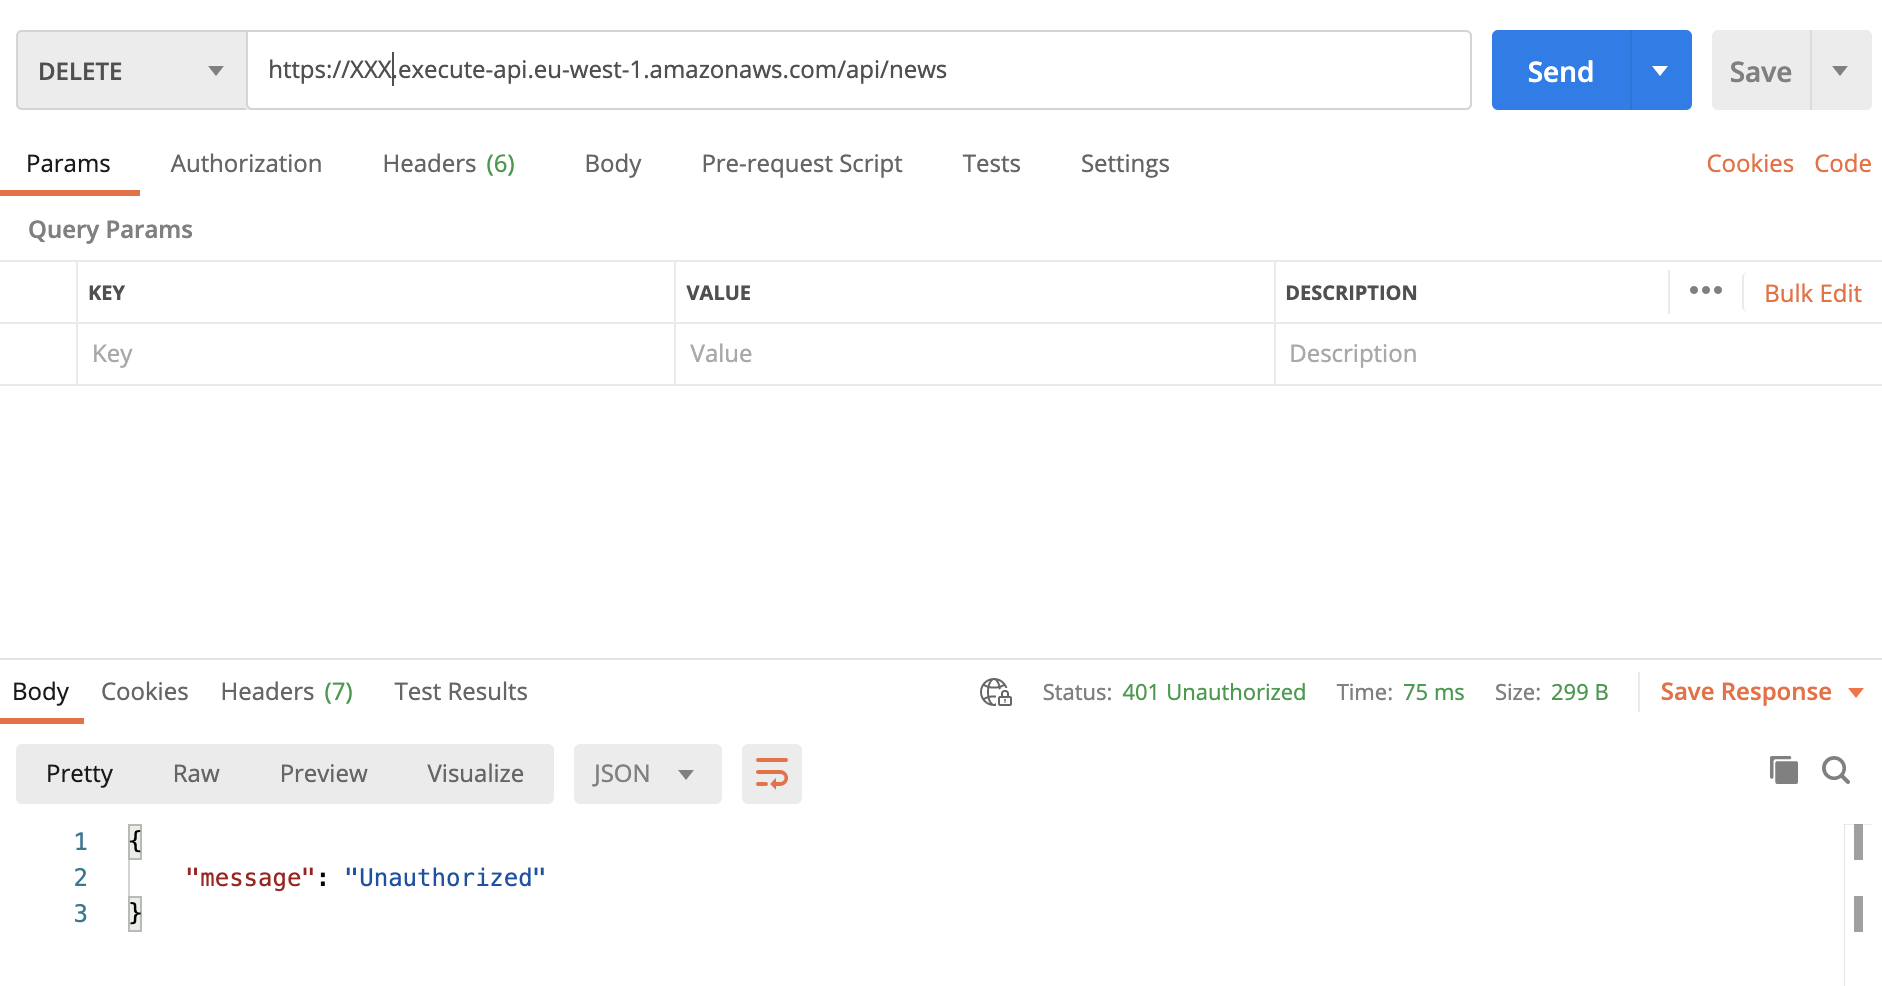 Fig.10 – Now all the requests to
 DELETE /news API have to be authenticated.
The first half of the test is complete: if a request doesn’t have a token, the related call will be rejected. Perfect.
Now we need to complete the second half of the test: if the request has the right token the call will be authorized. To do this we have to do three things:
create a user in Cognito User Pool;
confirm the user registration;
authenticate in Cognito to get the token;
Steps
17. As a first step, we need to sign up ourselves into the user pool. In a real case scenario, this operation will be completed using a web interface, but for the sake of simplicity we will register into the pool using AWS CLI:
aws cognito-idp sign-up --client-id <app-client-id> --username <username> --password <password> --user-attributes Name=email,Value=<email>
As <app-client-id> you need to use the id of the app client created before, then you have to choose a <username>, a <password> and an <email>.
If the above command has been successful you should see an output like:
{
    "UserConfirmed": false,
    "CodeDeliveryDetails": {
        "Destination": "<email>",
        "DeliveryMedium": "EMAIL",
        "AttributeName": "email"
    },
    "UserSub": "XXXXXXXX-XXXX-XXXX-XXXX-XXXXXXXXXXXX"
}
18. You should have received an email with a verification code; copy that code and replace it with the <code> placeholder in the command below:
aws cognito-idp confirm-sign-up --client-id <app-client-id> --username <username> --confirmation-code <code>
19. Now you should be ready to sign-in using the initiate-auth command:
aws cognito-idp initiate-auth --auth-flow USER_PASSWORD_AUTH --client-id <app-client-it> --auth-parameters USERNAME=<username>,PASSWORD=<password>
If everything goes as expected you should see the tokens in the JSON response:
{
    "ChallengeParameters": {},
    "AuthenticationResult": {
        "AccessToken": "<access-token>",
        "ExpiresIn": 3600,
        "TokenType": "Bearer",
        "RefreshToken": "<refresh-token>",
        "IdToken": "<id-token>"
    }
}
Copy the IdToken value and open Postman, request the API as before, but this time adding the Authorization header with <id-token> as value. If everything goes as expected you should see the HTTP 200 as a response.
Conclusion
In less than twenty steps, we have seen how simple it is to protect APIs using the Cognito User Pool. To keep the process easy, we haven’t created the client application – but, keep in mind that Cognito SDK has the same property that we have used in this story (i.e. sign-up, confirm-sign-up and initiate-auth), and you only have to adapt them. Furthermore, if you want to skip the tough parts, Cognito User Pool offers the so-called Hosted UI to relieve you of the struggle of authentication management.
We are protecting the API based only on authentication. That means: if a user is authenticated it can call the DELETE /news. This is the first step towards better endpoint protection but in a more complex scenario, you may need a more advanced approach, such as something like an authenticated user being able to GET /news but only an authenticated user of the admin group being able to DELETE /news. This approach is called group-based authentication and we will discuss this in a further article.